To level a patio base, you need to excavate to the right depth, fill the void with compactable aggregate (MOT Type 1 hardcore in the UK, or crushed stone in the US), compact it in thin lifts of no more than 50–75mm at a time, and check your levels constantly with string lines or a laser level, all while building in a slight drainage slope away from your house. Get these steps right and everything you lay on top (pavers, blocks, or slabs) will stay put for years. Rush any one of them and you'll be relaying slabs inside five years.
How to Level a Patio Base: Step-by-Step Sub-Base Guide

Clara Farrell
5 Jun 2026
Assess the site and decide how level (and how sloped) your base needs to be
Before you move a single spade of soil, stand in your patio area and think about where rainwater needs to go. A perfectly flat patio is actually a problem, water sits, moss grows, and it eventually finds its way into your house. What you want is a patio that looks flat to the eye but has a gentle fall built in that moves water away from the building.
The standard target in the UK is a fall of 1:60, which works out to about 16mm of drop for every metre of patio width. For textured slabs or block paving, you can get away with 1:80 (roughly 12.5mm per metre), but 1:60 is the safer target to aim for. In the US, the equivalent guidance is 1/8 to 1/4 inch of drop per foot of run, that's roughly a 1% to 2% slope. Either way, the direction of fall must be away from your house, toward a garden, lawn, or drainage channel.
At this stage, walk the site and look for obvious low spots, soft areas where the ground sinks underfoot, and any tree roots or debris you'll need to remove. Note where any existing drainage sits relative to your planned patio edge, your finished paver surface should sit about 3–6mm above adjacent drainage inlets so water flows in rather than backing up. Jot these observations down. They'll shape every decision you make in the steps that follow.
Choose your sub-base material and plan your layer thicknesses
The sub-base is the structural workhorse of your patio. It distributes load, resists movement, and (if you use the right material) drains freely. For most domestic DIY patios in the UK, MOT Type 1 crushed limestone is the go-to choice. It's angular, compacts tightly, and it's widely available from builders' merchants. In the US, equivalent products are labelled as crushed stone or compactable gravel base, often referenced by a grading like Class II or similar local standards. To get patio blocks to sit level, you will also need the right bedding layer and careful compaction across the whole area compactable gravel base.
For a standard residential patio, the rule of thumb is a minimum of 100–150mm of compacted MOT Type 1. For most domestic installs, 150mm is the safer number, especially if your ground is clay-heavy or soft. On top of the sub-base, you'll need either a mortar bed (for slabs and natural stone) or a sand bedding layer (for block paving and concrete pavers). Here's how the typical build-up stacks:
| Layer | Typical Thickness | Material |
|---|---|---|
| Compacted sub-base | 100–150mm (minimum) | MOT Type 1 / crushed stone |
| Sand blinding (block paving) | 30mm after compaction | Sharp sand / coarse concrete sand |
| Mortar bed (slabs/stone) | 30–40mm (compacted to ~25mm after tamping) | 4 parts sharp sand : 1 part cement |
| Paving unit | Varies by slab/block type | Your chosen paving material |
If you're laying natural stone, porcelain, or sandstone, plan for a full mortar bed rather than spot bedding. Spot bedding (dollops of mortar at five points under a slab) looks tempting because it's faster, but it leaves voids that cause slabs to crack and rock. A consistent 30–40mm mortar bed is the right approach for durable results.
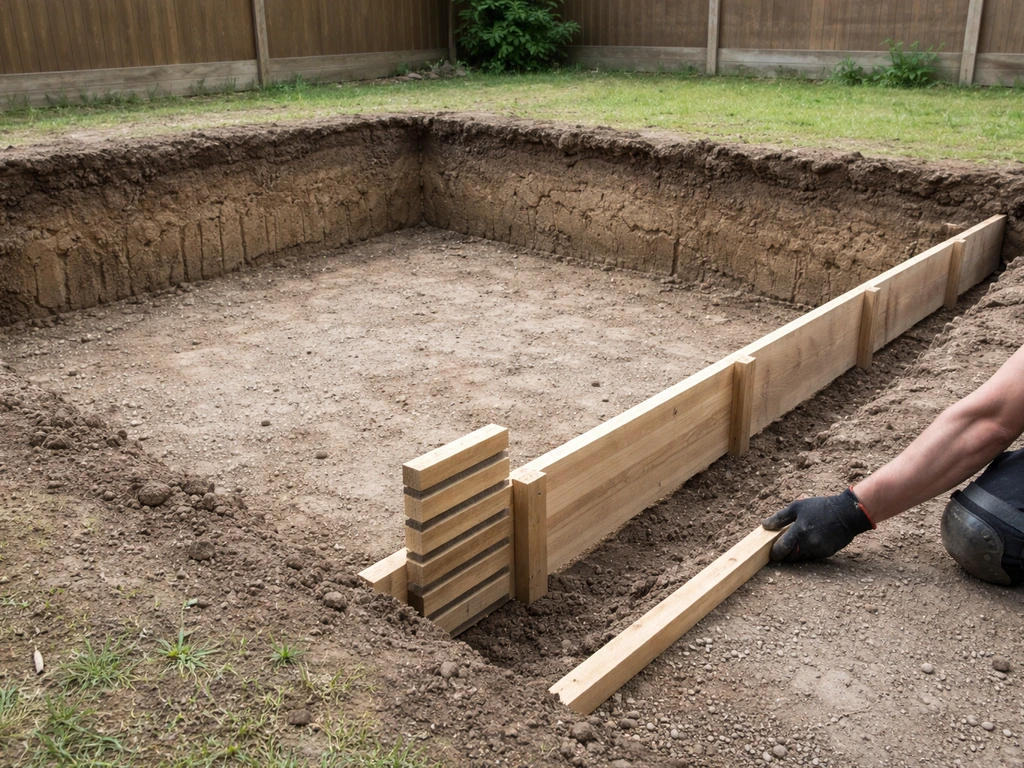
Excavate to the right depth, then set your formwork and edging
Add up your layer thicknesses to work out your excavation depth. For a typical UK slab patio, you're looking at: 150mm sub-base + 40mm mortar bed + slab thickness (often 38–50mm for standard concrete flags, or 20mm for porcelain). That puts you at 200–240mm of excavation depth below your finished surface level. Mark this depth on a timber stake and use it as your reference across the whole area.
Excavate the whole area, removing all topsoil, roots, and organic material. Topsoil is not a foundation, it compresses and rots. Once you hit stable subgrade (firm, consistent soil or clay), you're at the right depth. If you hit soft spots or you've over-excavated in places, don't just leave them. Fill over-dug areas with sub-base material and compact them before continuing.
Now set your formwork. Timber boards (typically 50mm x 100mm or similar) fixed to timber stakes make excellent temporary edge guides. These boards serve two purposes: they hold your patio shape during construction and they act as screed rails so you can drag your sub-base to a consistent depth and fall. Set the tops of your formwork boards to the finished sub-base level (not the finished paving level, remember to account for your bedding layer on top). Use a spirit level and a long straightedge to get the boards running at the correct fall, 16mm drop per metre if you're targeting 1:60.
For permanent edge restraints (which you'll want for block paving especially), these need to be fixed into the compacted aggregate base, not into loose sand or soil. Secure them once your sub-base is compacted and verified level, not before. Edge restraints are what stop your pavers spreading outward over time, so they need a solid footing.
Build and level the sub-base: spreading, screeding, and compacting in lifts
This is the most important part of the whole job, and it's also where most DIYers go wrong by rushing. The golden rule: compact in thin lifts. Basalite’s Tech Spec 2 guidance also emphasizes keeping a consistent lift thickness during compaction as part of correct base construction compact in thin lifts. Never dump your entire sub-base depth in at once and try to compact it down in one go. The plate compactor (or wacker plate) simply won't reach the material at the bottom of a thick loose layer, and you'll end up with a sub-base that looks solid on top but has soft, loose material underneath. That's what causes patios to sink.
Work in layers of 50–75mm of loose material at a time (this compacts down to roughly 50mm). In the US, ICPI guidance recommends compacting in 6-inch (150mm) lifts, but for DIY work with a standard plate compactor, 50–75mm loose lifts are safer and more controllable. Here's the process to repeat for each lift:
- Tip or shovel your MOT Type 1 into the excavated area and spread it roughly level using a rake.
- Use a long timber board or metal screed bar dragged across the tops of your formwork rails to pull the material to a consistent depth. This is called screeding, and it's how you get the fall built in accurately — because your formwork rails are already set to the correct slope.
- Run your plate compactor over the whole area in overlapping passes. Go in one direction first, then cross-hatch with passes at 90 degrees to the first. Pay extra attention to edges and corners where compaction is often missed.
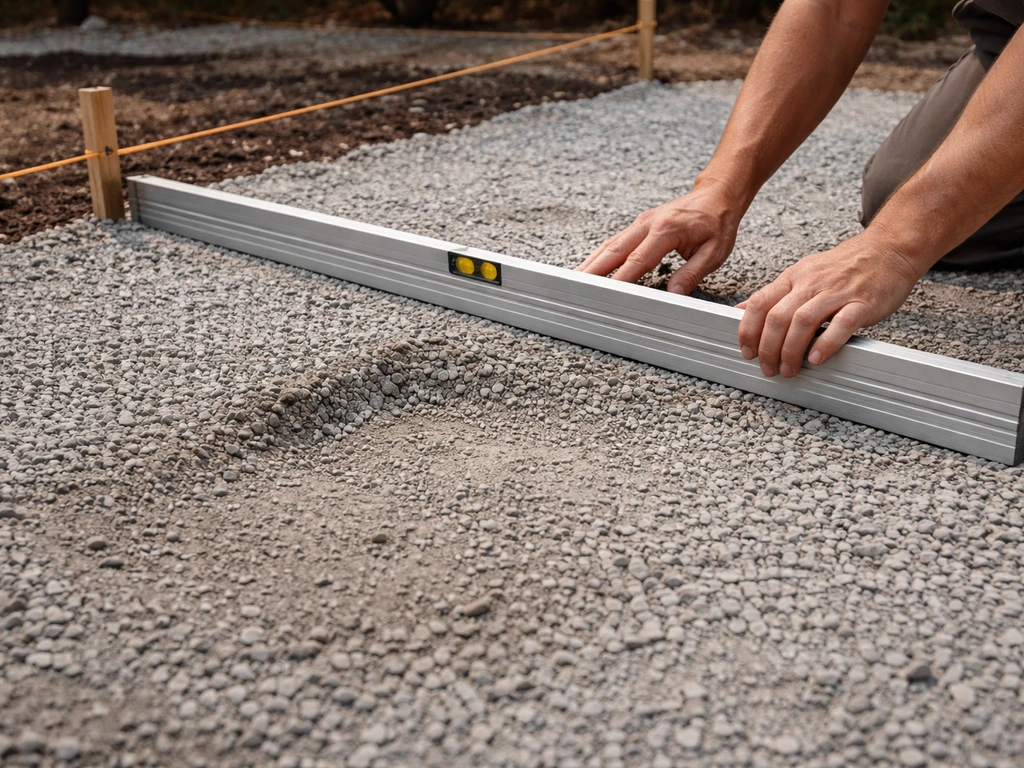
- Check the surface with a long straightedge or spirit level. Look for high and low spots.
- Top up any low spots with fresh material, rake level, and compact again. Scrape down any high spots.
- Repeat the check, fill, and compact cycle until the lift is firm and consistent.
- Add the next lift and repeat the whole process.
Compact until the plate compactor stops leaving visible impressions in the surface. If you can still see the machine's vibration pushing material around, it needs more passes. A properly compacted sub-base feels and sounds solid underfoot, no flex, no movement.
Check your levels properly, and fix high and low spots as you go
Checking levels isn't a one-time event at the end. If you're unsure how to lay a level patio from start to finish, follow the levelling and drainage checks closely before you set any slabs or pavers. Do it after each compaction pass. The tools you'll use depend on your budget and the size of the area, but even a basic kit gets the job done well.
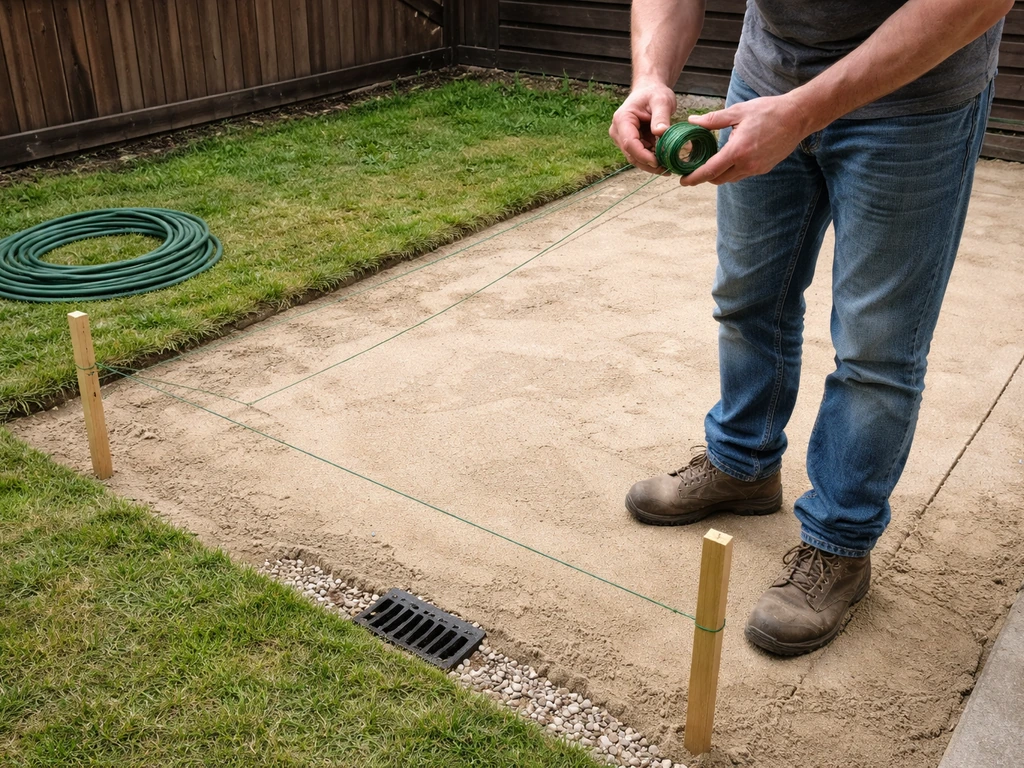
String lines
String lines are your cheapest and most versatile levelling tool. Bang timber stakes or pins into the ground just outside your excavated area and run taut string lines across the patio at set heights. Use a line level (a small bubble level that clips onto the string) to get the string running at the correct gradient. Measure down from the string to your sub-base surface at multiple points using a tape measure or a story rod (a marked stick). The measurement should be consistent across the whole area. If it varies, you've found a high or low spot.
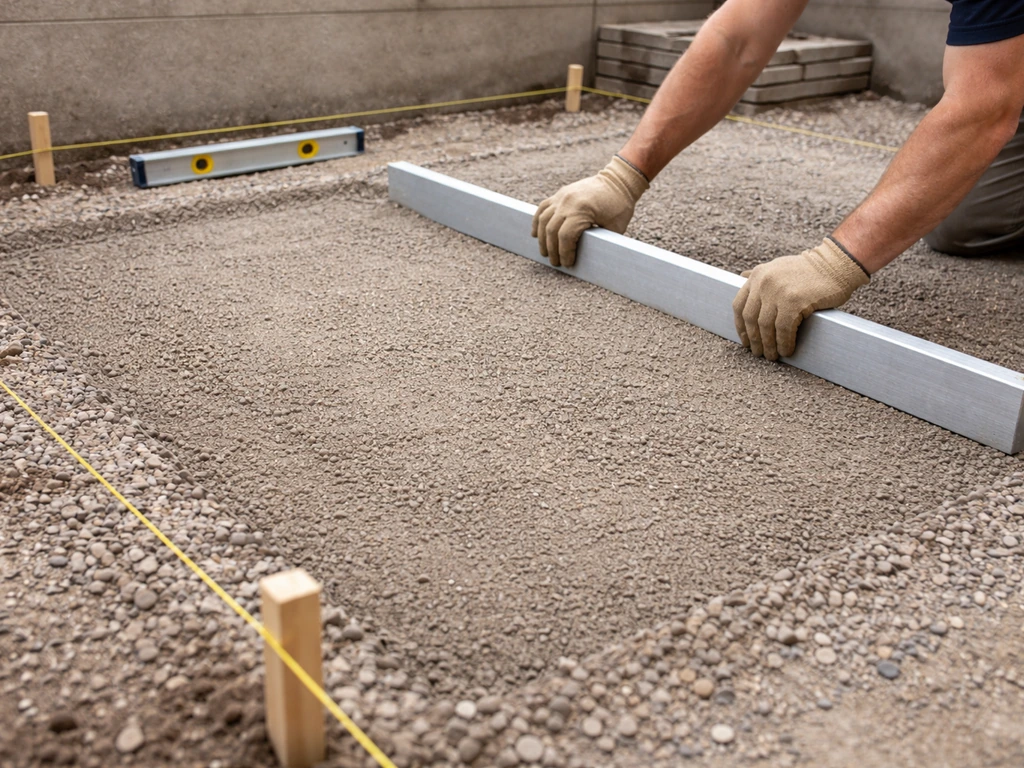
Spirit levels and straightedges
A long spirit level (1.8–2.4m) placed on a straight timber board lets you span across the sub-base and check both level and fall. For fall, you can use a small packing shim of known thickness under one end of the level, for a 1:60 fall over 1.5m, for example, you'd expect about 25mm of drop. If the bubble reads level with a 25mm shim under the lower end, your fall is spot on.
Laser levels
A rotating laser level is genuinely worth hiring for larger patios (anything over 15–20 square metres). Set it up on a tripod outside the excavation, spin the laser, and use a staff or receiver to measure from the laser beam to your sub-base surface at grid points across the whole area. It's fast, accurate, and removes the guesswork from checking falls across irregular shapes.
What to do with high and low spots
High spots are easy, scarify (rake or scratch up) the surface a few millimetres to break the compacted crust, then re-compact. Don't just add material on top of a high spot. Low spots need fresh sub-base material raked in and compacted down. If a low spot keeps reappearing after compaction, it's usually a sign of a soft spot in the subgrade underneath. Dig it out, fill it with sub-base material from the bottom up, and compact in layers. Never skip this, a soft subgrade spot will become a sunken slab within a season.
Drainage checks and getting the base ready for your paving layer
Once your sub-base is fully compacted and your levels are verified, do a final drainage check before you move on. Stand back and visually assess the slope, it should be obvious even to the eye that the surface falls away from the house. If you have a garden hose handy, run a trickle of water across the sub-base surface and watch where it flows. It should move away from the building consistently, not pool or meander sideways.
If you're laying block paving or concrete pavers with a sand bedding course, the next step is spreading and screeding a 30mm layer of sharp sand (or coarse bedding sand meeting ASTM C33 grading in the US) over the compacted sub-base. Screed this layer using pipe rails or timber battens set to your finished sand depth, dragging a straight board across them. Don't walk on screeded sand, work from boards to keep it undisturbed until the pavers go down.
If you're laying mortar-bedded slabs or natural stone, you're ready to start mixing and applying your mortar bed. The standard UK mix is 4 parts sharp sand to 1 part cement, applied at 30–40mm and tamped down to roughly 25mm as each slab is bedded in. Work in manageable sections, typically no more than a square metre at a time so the mortar doesn't set before the slab goes down. Your sub-base is also the point at which permanent plastic or aluminium edge restraints should be fixed and pinned, if you're using them for block paving. Spike them into the compacted base at regular intervals around the perimeter.
This is also where the work you did levelling the soil and ground beneath the sub-base pays off. After you build the sub-base, keep checking that the slope you set when leveling soil still drains water away from the house how to level soil for patio. If you've got a consistently compacted, correctly sloped sub-base, the bedding and paving layers above are straightforward to set accurately.
For a patio that’s truly level to the eye, follow the full process for how to level ground for a patio before you start building the base. If the base is uneven, you'll be fighting it the whole way through the lay. The sub-base really is the foundation for everything else on the project.
Common mistakes that catch people out
- Compacting too thick a layer at once — the material at the bottom doesn't compact, and it settles later. Keep lifts to 50–75mm loose depth.
- Not removing all topsoil — any organic material left in the sub-base will rot down and create voids and soft spots.
- Skipping the fall — a flat patio is a puddling patio. Build the slope in from the first formwork setup, not as an afterthought.
- Checking levels only once at the end — check after every compaction pass while you can still easily fix problems.
- Fixing edge restraints before compaction is done — the compactor will knock them out of position. Compact first, fix restraints into the solid base second.
- Using building sand instead of sharp sand for bedding — building sand is too fine, holds moisture, and doesn't give the stable, free-draining bed you need.
FAQ
What should I do if my ground is already hard but uneven, do I still need full excavation to subgrade?
Yes. Even if the soil feels firm, you still need to remove topsoil and any organic layer, then excavate to a consistent depth so your sub-base has uniform thickness. If you leave thin areas of sub-base or disturbed material, those spots become the first place the patio sinks or rocks.
How do I know whether my slope is correct for drainage before I start laying pavers or slabs?
Test it after each compaction stage using a consistent reference, for example measure from a single string line or a laser grid. Then do a “direction check” with a hose trickle, water should move away from the house in a predictable path without pooling at low edges or running sideways toward the building.
Is it OK to compact wet sub-base material to save time?
Usually no, not without control. Compaction works best at near-optimum moisture, too dry will not bind, too wet can lead to pumping or soft zones after it dries. If you suspect it is wet, spread and let it breathe, then compact again in thin lifts.
Can I level a low spot by adding bedding sand instead of fixing the sub-base?
Avoid that. Bedding sand is for setting pavers, not structural correction. If the sub-base has a dip, the bedding will compress later and the paver will rock or crack, the fix is to add, re-rake, and compact sub-base material at that location.
What’s the safest way to handle tree roots near a patio area?
Remove roots and contaminated debris before excavating to depth, and do not just cut them flush and bury them. If you can’t remove a thicker root, you may need to redesign around it, because root growth can lift and fracture paving even if the base is well compacted.
Do I need geotextile membrane under the sub-base to level a patio base?
It depends on site conditions, if you have migrating fine soil (like clay/silt) you can use a separation fabric to reduce pumping of fines into the aggregate. Do not use fabric as a leveling tool, and ensure it lies flat without wrinkles that create voids and uneven settlement.
How thick should my compacted sub-base be for heavy traffic or driveways?
For a typical domestic patio the usual minimum is 100–150mm compacted, but for areas that will see cars, a thicker engineered base is required, often more than a DIY patio build. If you are unsure, check local driveway requirements or consult a compaction thickness recommendation based on soil bearing capacity.
What edge restraints should I use, and how do I prevent the base from pushing outward?
Use restraints designed for your paving type (especially for block paving), and fix them into the compacted aggregate base, not loose sand or soil. Keep them continuous around the perimeter, gaps or weak corners let pavers spread, which can also distort your drainage fall.
How can I check for soft spots in the subgrade before compacting aggregate?
Walk the area and probe lightly with a tool, soft spots feel springy or allow it to sink. If you see footprints that remain, or the subgrade deforms underfoot, excavate those areas, replace from the bottom with compactable material, then compact in lifts until the surface feels solid and firm.
How do I measure level and fall accurately on an irregular patio shape?
Use a grid approach, set reference strings or a laser outside the excavated footprint, then measure at multiple points across the area, not just at the edges. Mark any deviation before you compact further, because once material is covered it’s hard to correct without rebuilding.
Should I re-check levels after I spread bedding sand or mortar?
Yes. Even though bedding thickness is usually adjustable, a bad base slope will be “baked in.” After screeding sand or placing mortar, confirm you still have the same fall direction away from the house, and avoid walking directly on screeded sand since it disturbs level.
What’s the most common leveling mistake that causes patio movement within a year or two?
Skipping lift-by-lift compaction. When the plate cannot reach the full thickness of a deep layer, you end up with loose material beneath a crust, later traffic or freeze-thaw causes settlement, leading to rocking slabs, gaps, and uneven paving.