To level soil for a patio, you excavate to the right depth, remove all organic material, shape the ground to a gentle drainage slope of 1/8 to 1/4 inch per foot away from the house, compact the subgrade, then build up a crushed-stone base in compacted layers before finishing with a 1-inch sand bedding layer. That's the whole process. Everything below is about doing each of those steps correctly so your patio doesn't sink, tilt, or flood.
How to Level Soil for a Patio: Step by Step Guide

Clara Farrell
16 Jun 2026
What 'level' actually means for a patio (hint: it's not perfectly flat)
This trips up a lot of first-timers. A patio surface should look level to the eye and feel level when you walk on it, but it cannot be mathematically flat or water will pool on it every time it rains. The industry standard, backed by guidance from paver manufacturers like Belgard, Techo-Bloc, and Block-Lite, is a slope of 1/8 to 1/4 inch per foot away from your house. On a 12-foot-deep patio, that works out to between 1.5 and 3 inches of total drop from the house wall to the outer edge. At the 1/4-inch-per-foot end you're looking at about a 2% slope, which is noticeable if you measure it but nearly invisible when you're standing on the finished patio.
You build this drainage slope into the soil and base layers, not by tilting the pavers themselves. The pavers sit flat on the bedding sand; the whole plane just gently pitches away from the structure. This is an important distinction because when people talk about 'leveling' the base, they mean leveling it within that sloped plane, not making it dead horizontal. Keep that mental picture throughout the whole job.
Assess your site and plan your final patio height
Before you dig a single shovelful, spend 20 minutes walking the site and answering a few key questions. Where does the ground slope naturally? Are there low spots that collect water after rain? What's the soil like: firm and gravelly, or soft clay that squishes underfoot? Clay soils drain poorly and may need extra excavation depth and a layer of woven geotextile fabric to stop fines from migrating up into your base. Soft, boggy ground may need even more aggressive base building. The more honestly you assess things now, the fewer nasty surprises you'll hit later.
The most important number to nail down is your finished patio height. Work backward from whatever door threshold, step, or existing surface your patio needs to meet. Once you know where the top surface of the pavers has to land, you can calculate how deep to dig by adding up all the layers below: paver thickness + 1-inch bedding sand + compacted base depth.
A standard 2 3/8-inch concrete paver, for example, puts the top of the compacted base 3 inches below the finished paver surface. If your base is 4 inches deep (standard for foot-traffic patios on decent soil), your total excavation depth from finish level is about 7 inches. Write that number on a stake and plant it at your reference corner before you start digging.
Set up string lines at this point. Drive stakes at each corner of the planned patio area, stretch string between them at finished patio height, and use a line level or a builder's level to confirm the strings are set to your intended drainage slope. Check that slope across the full width and depth of the area. These strings become your reference throughout the entire job, from digging to final compaction check.
Tools and materials you'll need
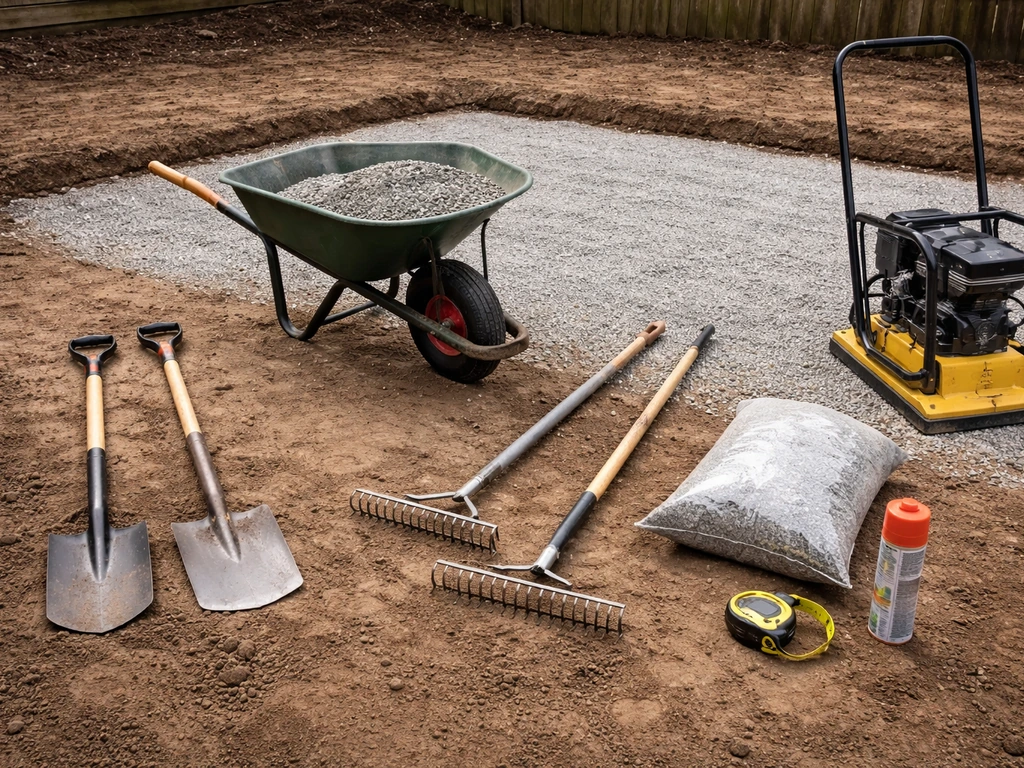
- Spade and square-mouth shovel for excavation
- Wheelbarrow for moving spoil
- Garden rake and a stiff landscape rake for shaping
- Tape measure and marking paint or spray chalk for layout
- Wooden or metal stakes and mason's string line
- Line level or a standard 4-foot spirit level
- Screed board (a straight 2x4 cut to span the patio width works fine)
- Plate compactor (rent one — don't try to get away with hand tamping on anything larger than a few square feet)
- Crushed angular stone for the base (commonly called road base, crusher run, or 3/4-inch minus)
- Coarse concrete sand or grit for the 1-inch bedding layer
- Woven geotextile landscape fabric (recommended for clay or soft soils)
- Edge restraints (plastic or aluminum paver edging with spikes)
The plate compactor is non-negotiable for any real patio. For crushed-stone base work, Techo-Bloc's installation guide specifies a minimum vibrating-plate compactor output of 5,000 lbf. Most rental-grade compactors meet or exceed that. Pick it up the same day you plan to compact so you're not paying for extra days.
Step-by-step: excavating and shaping the soil
Step 1: Mark out the area
Spray the patio outline on the ground, adding about 6 inches beyond each edge so your base material extends past the paver edge (this gives your edge restraint spikes something solid to grip). Set your corner stakes and string lines at finished patio height with the 1/8 to 1/4 inch per foot drainage slope built in.
Step 2: Excavate to depth
Dig out the full area to your calculated excavation depth. The goal here isn't just removing soil; it's getting rid of every bit of topsoil, grass, roots, and organic matter. Organic material compresses and rots over time, which causes the base above it to settle unevenly. Even a thin layer of root-filled topsoil left behind will cause problems. Check your depth often by measuring down from the string lines as you go. It's much easier to remove a little more soil than to add it back and compact it adequately.
Step 3: Shape the subgrade to your drainage slope
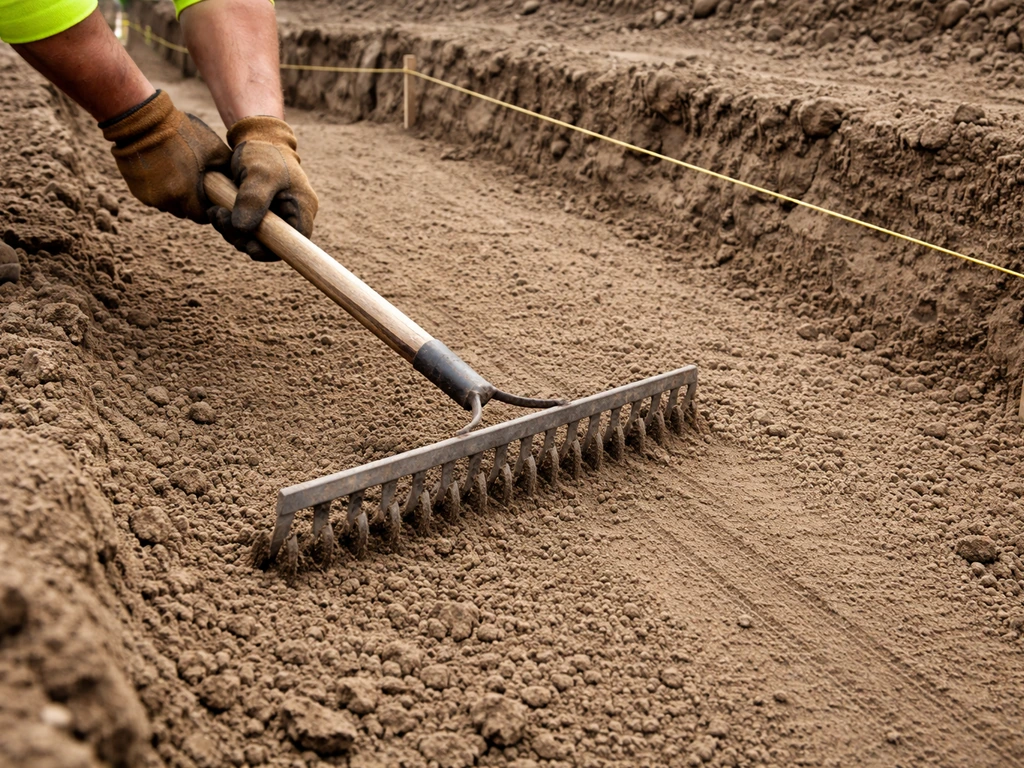
Once you're at roughly the right depth, use a rake to shape the exposed soil surface to match your intended slope. The subgrade (the bare soil at the bottom of your excavation) should mirror the same 1/8 to 1/4 inch per foot pitch as the finished surface. Use your string lines and a tape measure to check at multiple points. Rake out any high ridges or low dips. You want a smooth, consistent surface with no undulations greater than about half an inch.
Step 4: Compact the subgrade
This step gets skipped more often than any other, and it's one of the biggest reasons patios settle and shift. Run the plate compactor over the entire excavated soil surface. Make at least two passes in different directions (north-south, then east-west). If the soil feels soft or springy after compacting, that's a warning sign: you may be dealing with poorly draining clay or organic fill. In that case, compact more thoroughly, and seriously consider laying a woven geotextile fabric over the subgrade before adding base material. The fabric stops fines from pumping up into your crushed stone and keeps the base stable for years.
Building the right base and getting the thickness right
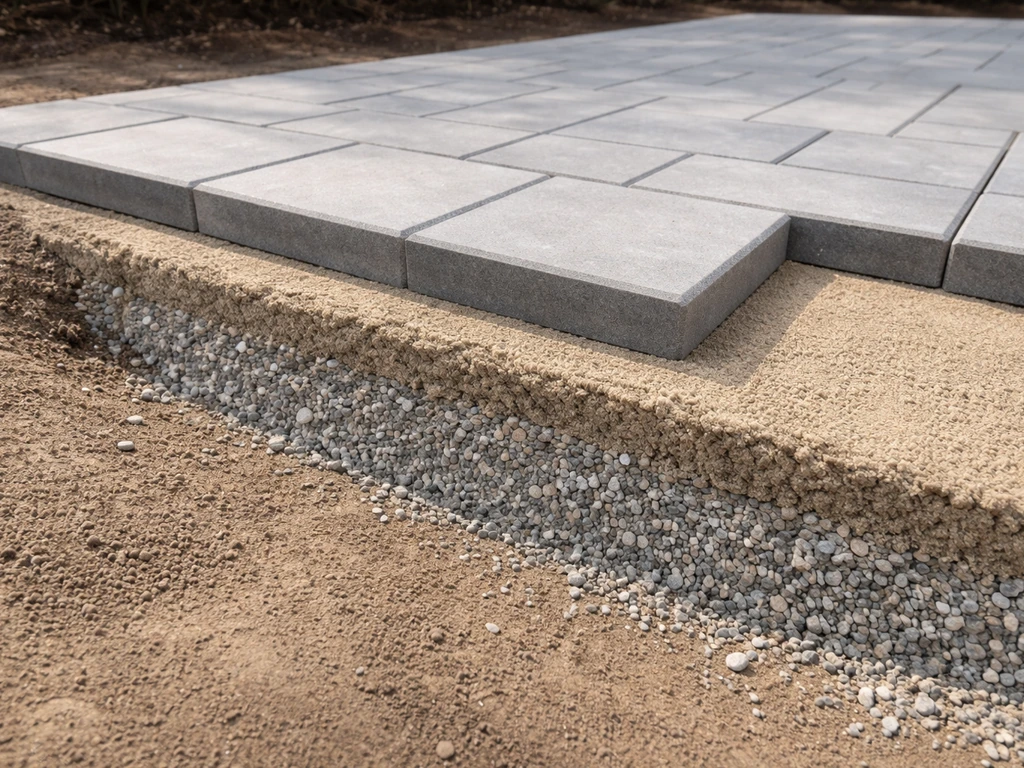
For a typical residential patio used only by foot traffic, a 4-inch compacted crushed-stone base is the standard minimum. SEK SUREBOND specifically notes that polymeric sand is mixed to the ASTM C-144 sand gradation and that proper base conditions and joint-filling technique, including the right tools and rollers/hammer guidance during activation and compaction, are key to practical installation outcomes polymeric sand is mixed to ASTM C-144 sand gradation. If you're in a region with significant freeze-thaw cycles, or if the soil is soft clay, 6 inches is smarter. Use angular crushed stone (road base or crusher run), not rounded pea gravel. Angular stone locks together when compacted; rounded stone stays loose and shifts under load.
Add the base material in layers (called lifts), not all at once. Techo-Bloc recommends compacting in 4-inch lifts. Techo-Bloc’s installation guide also discusses slope verification during excavation and the base-setting logic using concrete sand lifts Techo-Bloc recommends compacting in 4-inch lifts. So for a 4-inch base you'll add one layer, compact it, then check. For a 6-inch base, add about 3 inches, compact, add another 3 inches, compact again. Dumping all 6 inches in and running the compactor over the top produces a surface that looks compacted but has loose material underneath, and that's exactly what causes patios to sink in spots.
How to level each base lift
After spreading each lift, use the landscape rake to distribute it evenly across the area. Then drag your screed board (the straight 2x4) across the surface, resting each end on your string lines or on temporary screed rails set at the correct height. This drags off high spots and fills in low ones. Compact the lift, check it against the string lines again, and fill any depressions before moving on. Don't compact a lift and then add loose fill on top without another compaction pass, as that creates weak spots.
| Soil type | Recommended base depth | Geotextile needed? | Notes |
|---|---|---|---|
| Firm, well-draining loam or gravel | 4 inches compacted | Optional | Standard residential patio setup |
| Clay or poorly draining soil | 6 inches compacted | Yes, strongly recommended | Extra depth compensates for poor subgrade support |
| Sandy soil (loose/unconsolidated) | 4–6 inches compacted | Yes | Sandy soil can shift; fabric prevents base contamination |
| Existing fill or made-up ground | 6+ inches compacted | Yes | Unknown compaction history; treat conservatively |
Final compaction and leveling checks before you lay anything
Once your base is fully built and compacted, do a thorough check before touching the bedding sand. Set a long straightedge (a 6 to 10-foot aluminum level or a straight timber works) across the surface in multiple directions. Look for any gap between the straightedge and the base. Gaps larger than about 3/8 inch need to be corrected now: add a little crushed stone, tamp by hand, compact again. Don't skip this step and hope the bedding sand will fix it. One inch of sand is meant to provide fine adjustment, not structural correction.
Check your drainage slope one more time using your string lines and a tape measure. Measure down from the string to the base surface at the high point (near the house) and at the outer edge. The difference should match your intended slope. If it's off, now is the time to scrape or add material and recompact. Once pavers are down, fixing grade is exponentially harder. If you want a deeper walkthrough, review this guide on how to level a patio base so your slope stays true before bedding sand goes in.
When you're satisfied the base is correct, add the 1-inch bedding sand layer. Spread coarse concrete sand evenly using screed rails and your screed board, maintaining that same drainage slope in the sand surface. Belgard and most major paver manufacturers specify at least 1 inch of bedding sand. Don't go thicker than about 1.5 inches: too much sand causes pavers to settle unevenly when loaded, because pavers can sink as much as 3/8 inch into the bedding when compacted into place. Thicker sand beds amplify that settlement unpredictably.
Mistakes that catch people out (and how to fix them)
- Leaving topsoil or roots under the base: this is the single most common cause of long-term settling. If you realize you've done this, the only real fix is to pull up what you've laid, dig out the organic material, and start again. There's no shortcut.
- Not compacting in lifts: if your base feels firm on top but soft underneath, add more base material in a thin layer, compact again, and repeat. But honestly, if the base was placed in one deep lift it may need to be partially removed and rebuilt properly.
- Slope is toward the house instead of away: catch this early by checking with a level and tape before compacting. If you've already compacted and the grade is wrong, you'll need to add material to the low side (house side) and recompact the full area.
- Base is the right depth on average but uneven in spots: use a straightedge to find high and low points, add fine crusher dust or screenings to low spots, and recompact. Don't use loose soil to fill depressions.
- Too much bedding sand: if you've screeded more than 1.5 inches of sand, scrape some back off and re-screed. Excess sand causes pavers to rock and settle unpredictably.
- Skipping edge restraints: without them, the base at the perimeter shifts outward over time, and the whole paved surface starts to spread and lift at the edges. Install edge restraints before laying pavers, with spikes driven through the base layer into the compacted subgrade.
- Not accounting for paver thickness when setting excavation depth: if your finished pavers end up sitting 2 inches too high or too low relative to a door threshold or step, it's an expensive problem. Measure twice before you dig.
A note on more complex situations
If you're working on significantly sloped ground, the soil leveling process described here is still the foundation, but you'll also need to think about whether you're cutting into the slope, building up on the low side, or doing both. Steeply sloped sites often require retaining walls or a step-down patio design, and the drainage calculations become more involved. Similarly, if you're installing porcelain or thin-format tile rather than concrete pavers, the base and bedding requirements can differ (some systems require a full mortar bed rather than loose-lay sand). The leveling principles are the same, but the specific tolerances and layer thicknesses change.
Once the soil and base are correctly leveled, the next steps (laying patio blocks, leveling sand for the bedding layer, setting individual pavers level with each other, and achieving a level finished patio surface) each build directly on the quality of the ground preparation you've just done. Rushing or skimping on the soil-leveling stage creates problems that ripple through every subsequent step. Get this part right and the rest of the project is genuinely straightforward.
If you still want a more detailed walkthrough of each phase, see how to level patio blocks for the next steps once your base and slope are dialed in. If you follow these steps for setting the drainage slope and confirming grade, you’ll know how to lay a level patio.
FAQ
Can I make the patio perfectly level and still prevent pooling?
If your patio is already partially built or you are patching a low spot after compaction, scrape back to a stable, compacted base layer first. Then add only the missing base material in a lift (not a thick one-time fill), compact again, and recheck the drainage slope with the string lines. If you try to fix grade by adding bedding sand only, the base will still settle later.
How do I know if my patio slope is correct, without guessing?
No, the surface needs a gentle pitch away from the house, even if it looks level to the eye. A practical check is to confirm your slope at multiple points with a tape measure, not just at one corner, because minor local waves can create small puddling basins.
What should I use as my reference height so the drainage slope stays accurate?
A string line method works best, but your finished slope is only as accurate as your reference height. Measure your finished patio height from a fixed feature you trust (door threshold or adjacent slab) and write down the total excavation depth before digging. If the reference point is off, everything else will be consistently wrong.
What should I do if the soil feels soft or springy after compacting?
If you compact and the subgrade feels springy, stop and correct before adding base. Springiness often means soft clay, trapped organic pockets, or insufficient excavation depth. Add compacted clean material, consider woven geotextile to limit fines migration, and recompact until the surface feels firm rather than squishy.
When is geotextile fabric actually worth using under a patio base?
Geotextile is most helpful when you have clay, silty soils, or any condition where fines can migrate into the crushed stone (for example, after saturation). It is less critical on well-draining, gravelly soils. If water drains slowly or you see fine material clouding up around stone, geotextile becomes a smart choice.
Why does the type of crushed stone matter for leveling and long-term stability?
Do not use rounded pea gravel. Rounded stones do not interlock, so they rearrange under load even if the top looks compacted. Use angular crushed stone (crusher run or road base style) and compact in layers so the particles lock together.
What changes if the patio site is sloped already?
Yes, but only if you keep the same drainage plane and still meet the base depth and lift-compaction rules. Start with the same excavation and slope shaping, then build up on the low side using more base layers, or cut where needed. If the site is steep enough that you start needing retaining walls, treat the design as a step-down or tiered patio rather than trying to brute-force grade with soil.
Does the same soil-leveling method work for porcelain tile or thin-format systems?
Yes, but you must match the system to the footing plan. For tile or special paver systems that do not use loose sand bedding, the leveling approach may require different substrates, thicknesses, or additional mortar steps. In those cases, confirm the required bedding and whether the base slope rule still applies as stated for your specific product.
How smooth does the subgrade need to be before you add crushed stone?
Aim for a smooth subgrade, with no visible humps or dips bigger than about half an inch, but you do not need to chase a ruler-straight mirror finish. The key is that any large undulations must be removed now, because crushed stone and sand are not meant to correct major waves after compaction.
Can I compact the base once at the end instead of compacting each lift?
Not usually. After you compact a lift, add the next lift only after you have spread and screeded it evenly, then compact again. Leaving loose material on top of a compacted layer can create weak planes that show up later as settlement lines.
What if I find gaps in the base after it is compacted, can sand fix them?
Sand is for fine adjustment and leveling, not structural correction. If you have gaps larger than about 3/8 inch when you check with a straightedge, fix the base now by adding and compacting more crushed stone. If you try to bridge those gaps with bedding sand, pavers can settle unevenly.