Building a block patio is one of the most satisfying DIY projects you can take on, and it's completely doable in a weekend or two if you follow the right order of operations. If you're specifically wondering how to build a patio with cement blocks, the same layout, base preparation, and drainage steps apply before you set the units.
How to Build a Block Patio Step by Step DIY Guide

Clara Farrell
2 Jun 2026
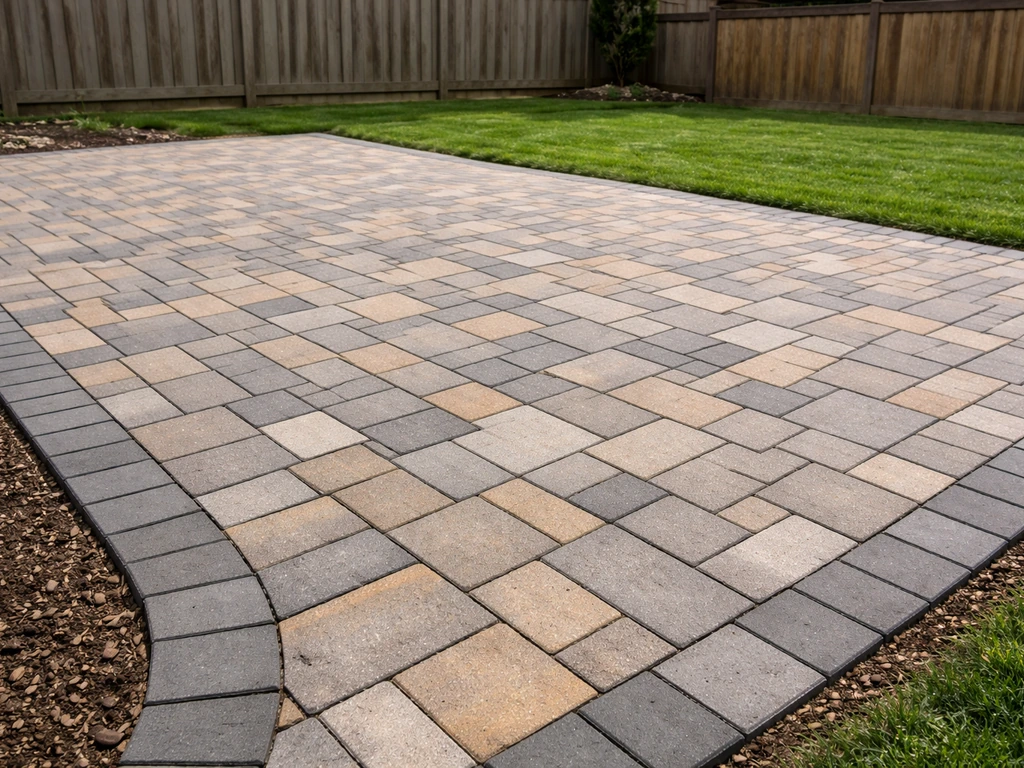
The basic process is this: plan and mark your layout, excavate and build a compacted gravel base, screed a 1-inch layer of bedding sand, set your pavers in pattern, install edge restraints, cut any pieces to fit, then lock the joints with polymeric sand. Do each step correctly and you'll have a patio that lasts decades. Skip steps or rush the base work, and you'll be pulling up pavers within a few years.
Planning and measuring your patio layout
Before you dig a single shovelful, spend real time on layout. The dimensions you mark on the ground become the foundation for every decision after it, so getting this right saves you a lot of grief later.
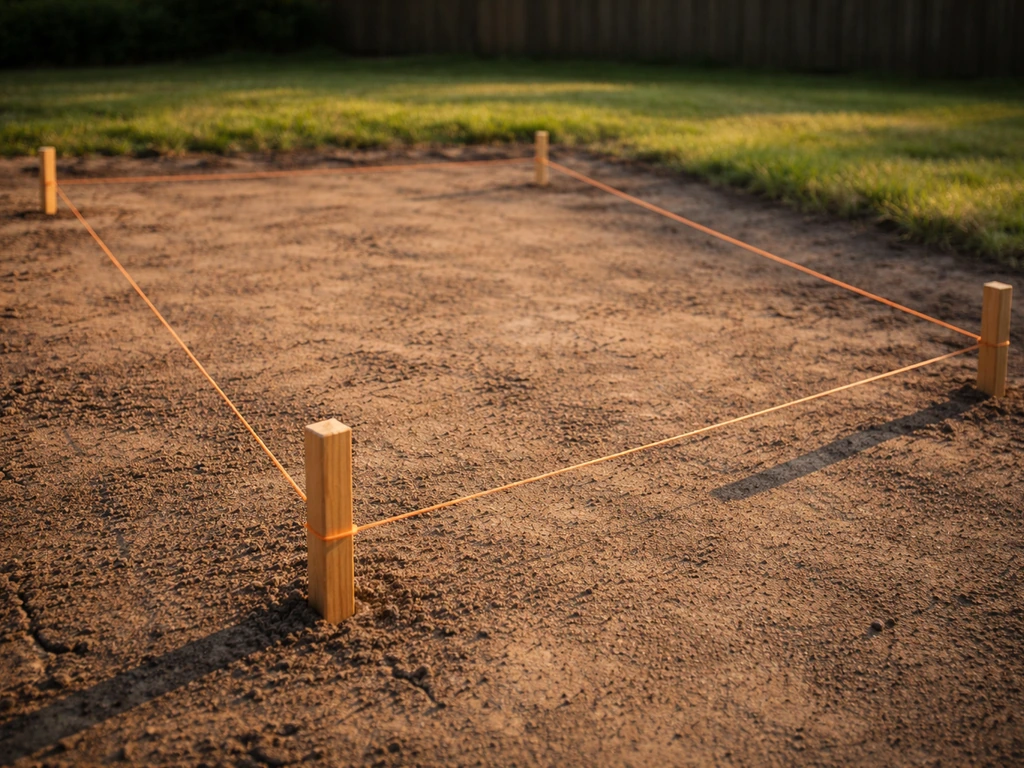
Start by driving stakes at each corner of your planned patio and running mason's line between them to define the perimeter. This string layout is your reference for both your digging boundary and your finished surface slope. Use a line level on the strings to confirm they're level at their base reference point, then intentionally set the drainage slope into the lines from there.
For drainage, you need the patio surface to slope away from your house at about 1/4 inch per foot, which works out to roughly 1 inch of drop over 8 feet. That's enough for water to run off without making the surface feel noticeably tilted. Set your strings to reflect this slope before you start digging, because your base layers will follow those same grades.
To make sure your corners are actually square and not just close, use the 3-4-5 method: measure 3 feet along one string from a corner stake, mark it, then measure 4 feet along the perpendicular string from the same stake, and mark that. The diagonal distance between those two marks should be exactly 5 feet. If it's not, adjust your stakes until it is. A skewed layout will show up in your finished patio, especially around the edges.
Once your perimeter strings are set and square, measure the total patio area and calculate how many blocks you need. For a simple rectangular layout with a standard running bond pattern, add 5% to your count for cuts and breakage. If you're planning a diagonal or herringbone pattern, bump that waste allowance up to 10-15% because you'll be making a lot more angled cuts. As a rough sense of scale, a 10x10 foot patio using common 4x8 inch pavers works out to roughly 115 pavers including a 5% waste factor.
Choosing block type, tools, and materials
The most common choice for a DIY block patio is standard interlocking concrete pavers, and honestly, they're great for most situations. They come in a wide range of shapes, thicknesses, and textures, they're strong enough for foot traffic and light furniture, and they're designed to be set in sand, which makes the installation forgiving and repairable down the road. Standard residential pavers are typically about 2 3/8 inches thick, which is fine for patios. If you're parking a car on it, you'd want 3 1/8-inch pavers, but for a standard outdoor living space, the thinner option works well.
You can also build with concrete patio blocks, which tend to be larger and flatter than interlocking pavers. These are simpler to lay but leave wider joints, and they don't interlock the same way, so edge restraint becomes even more important. If you're considering something more like a raised structure using retaining wall blocks, or building patio steps with block, those are really separate projects with different techniques.
If you're aiming for a raised patio, the best approach is to build up the tier using retaining wall blocks and then finish the top surface like a paver patio raised structure using retaining wall blocks. If you plan to add patio cinder block steps later, treat them as a separate build and plan the base and drainage accordingly building patio steps with block.
When you’re ready to add a transition from one level to another, patio block steps use similar base, leveling, and edging principles as the main patio patio steps.
What you'll need
- Patio blocks or pavers (quantity calculated from layout plus waste allowance)
- Crushed stone or compactible gravel for the base (at least 4 inches deep)
- Coarse bedding sand (enough for a 1-inch layer across your patio area)
- Polymeric jointing sand (for filling and locking joints)
- Plastic or aluminum edge restraints with galvanized spikes
- Geotextile landscape fabric (recommended for clay or wet soils)
- Mason's line and stakes for layout
- Line level
- Tape measure and framing square
- Plate compactor (rent one — don't skip this)
- Shovel and wheelbarrow
- Screed boards or metal pipes for screeding sand
- Rubber mallet
- Paver splitter or angle grinder with a segmented diamond blade for cuts
- Push broom
- Garden hose with a fine-mist nozzle
| Block Type | Best For | Joint Width | Repair Ease | Cost Range |
|---|---|---|---|---|
| Interlocking concrete pavers | Most patios, high durability, variety of patterns | Narrow (3/16 in.) | Easy — lift and reset | Moderate |
| Concrete patio blocks (flat) | Simple layouts, relaxed look | Wider joints | Easy — lift and reset | Low to moderate |
| Cement/cinder blocks | Raised or structured elements, steps | Mortared | Harder — mortar involved | Low |
| Natural stone pavers | Premium look, irregular sizing | Variable | Moderate — more cutting | Higher |
For most DIYers doing a standard backyard patio, interlocking concrete pavers are the best pick. They're uniform in thickness (which makes screeding and leveling much easier), they're widely available, and the polymeric sand joint system means weeds and shifting are less of an issue long term.
Site prep: excavation, base layers, and proper drainage
This is the part people want to rush, and it's the part that determines whether your patio lasts 5 years or 25. The base is everything.
Excavation
Dig out the patio area to a depth that accommodates your base gravel, bedding sand, and pavers, all while ending up at your target finished surface elevation. For a typical residential patio using 2 3/8-inch pavers, you're looking at: 4 inches of compacted gravel base, plus 1 inch of bedding sand, plus the paver thickness. That's roughly 7.5 inches of total excavation depth. Round up a bit and excavate about 8 inches down to give yourself working room.
When you're digging, go about 6 inches beyond your patio perimeter on all sides. That extra margin is where your edge restraints will anchor into the compacted base, so you need solid material out there, not loose backfill.
Once you've dug to depth, compact the native soil (the subgrade) with a plate compactor before doing anything else. If you've got clay soil or soil that stays wet for days after rain, this is the moment to lay down geotextile landscape fabric. The fabric sits between the native soil and your gravel base, and it does an important job: it stops fine soil particles from slowly migrating up into your gravel layer, which is one of the main causes of base settling and uneven pavers over time. On well-draining sandy or loamy soils you can often skip it, but on clay or expansive soils it's worth the extra cost.
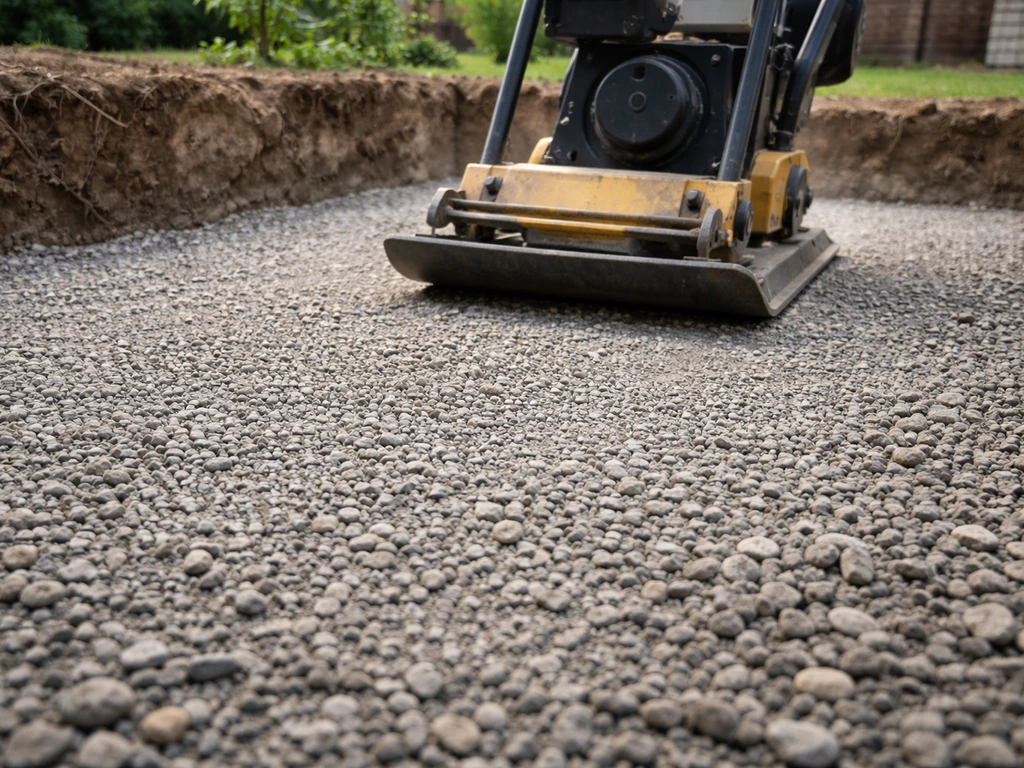
Building the base
Spread your crushed stone or compactible gravel in the excavated area and compact it in lifts of about 3 to 4 inches at a time. Don't dump the whole 4 inches in and try to compact it in one pass. Add half, compact thoroughly with multiple passes of the plate compactor, then add the rest and compact again. When you're done, the gravel surface should feel rock-solid and not deflect underfoot. The finished base surface should already reflect your drainage slope (1/4 inch per foot away from the house), not just be flat.
Bedding sand layer
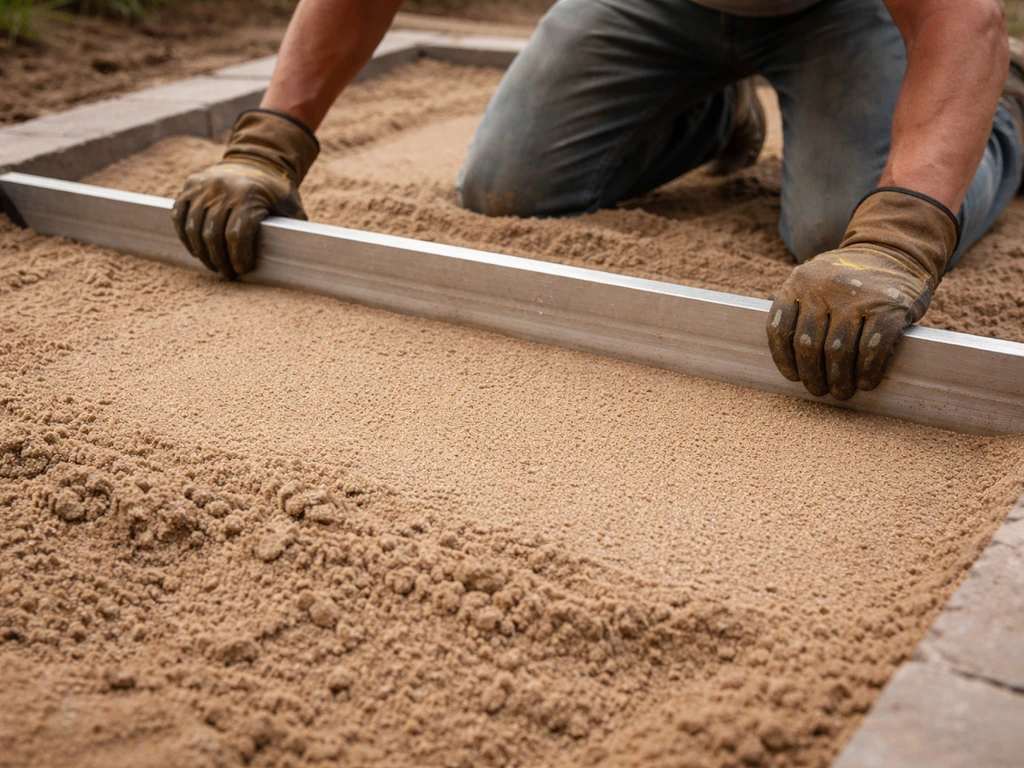
Spread coarse bedding sand over the compacted base to a nominal 1-inch thickness. This layer is what you'll screed to a smooth, even surface, and it allows minor adjustments to your paver height during setting. Do not use fine mason's sand or play sand here, coarse concrete sand gives you the stability you need. Once screeded, don't walk on the sand or disturb it before setting pavers. The 1-inch depth matters: thicker bedding sand is actually more prone to settling and shifting later.
Installing the block pavers (layout, edging, and setting method)
With your sand screeded and smooth, you're ready to start setting pavers. This is the most satisfying part of the project, and if your base work was solid, everything falls into place quickly.
Starting point and pattern

Start laying pavers from one corner, typically the most visible corner of the patio, and work outward in your chosen pattern. The most beginner-friendly patterns are running bond (like a standard brick wall on its side) or a simple grid. Herringbone at 45 degrees looks great but requires more cuts. Whichever pattern you choose, keep it consistent and check your alignment every few rows by snapping a chalk line across the tops of placed pavers.
Set each paver firmly onto the screeded sand by hand, pressing it down gently. Don't slide them into position, place them straight down. Use a rubber mallet to tap any paver that sits slightly high. Most interlocking pavers have built-in spacer nibs on their edges, which automatically give you a consistent joint width (usually around 3/16 of an inch). Work from the pavers you've already placed rather than stepping back onto the screeded sand.
Edge restraints
Once you have your pavers placed and before you compact, install your perimeter edge restraints. These plastic or aluminum channels fit snug against the outer edge of your pavers and get spiked into the compacted base with galvanized spikes, drive a spike through the restraint's pre-drilled holes roughly every 12 inches. Without proper edge restraints, the outer pavers gradually migrate outward under foot traffic and freeze-thaw cycles, which unravels the entire patio over time. This step is non-negotiable.
Compacting the pavers
After all the pavers are placed and edging is installed, run the plate compactor over the entire surface. This settles the pavers into the bedding sand and locks them into a unified, stable surface. Make at least two passes in different directions. Place a rubber pad or piece of carpet under the plate compactor if your pavers have a textured or tumbled finish, to avoid surface scratching.
Leveling, cutting, and finishing details
Checking and correcting level as you go
As you lay pavers, use a long straightedge or level every several rows to check that the surface is consistent. Individual pavers shouldn't sit higher or lower than their neighbors by more than 1/8 inch, otherwise you'll feel it when you walk across. If a paver sits too high, pull it up, remove a little sand, and reset it. If it sits too low, add a pinch of sand beneath it. Make these corrections as you go, not after the whole patio is down.
Cutting pavers to fit
The perimeter of almost any patio will require cut pieces to fill gaps. For straight cuts, a rented paver splitter (guillotine-style cutter) is fast, clean, and requires no power. Mark your cut line on the paver with chalk, align it in the splitter, and push down. For curved cuts or angles that a splitter can't handle, use an angle grinder fitted with a segmented diamond blade. Score the cut line with a shallow pass first, then make progressively deeper passes until you're through. Wear eye protection and a dust mask, concrete dust is not friendly.
Cut pieces that are smaller than about one-third of a full paver are fragile and prone to cracking under traffic. If your layout puts tiny slivers at the edge, consider shifting the whole layout slightly so your cuts end up larger and more structurally sound.
Filling the joints with polymeric sand
Polymeric sand is the finishing step that locks everything together and keeps weeds from setting up shop in your joints. Before you apply it, make sure the paver surface is completely dry. Sweep the polymeric sand across the patio with a push broom, working it into the joints from multiple directions until every joint is filled flush to the top. Blow or brush off any excess from the paver faces, residual polymeric sand left on the surface when you activate it will leave a haze that's hard to remove.
Once the joints are full and the surface is clean, blank" rel="noopener noreferrer">activate the sand with a gentle fine mist from a hose. Don't use a heavy stream or it will wash the sand back out of the joints. Mist the surface until the water just starts to sheet across and absorb into the joints, then let it cure. Most polymeric sand products are fully set within 24 hours in normal conditions, and you should avoid foot traffic during that window.
Common mistakes and troubleshooting for a lasting patio
Most patio problems trace back to the same handful of mistakes. Knowing them in advance is half the battle.
Wavy or rocking pavers
If pavers rock when you step on them or the surface looks wavy after compaction, the screeded sand wasn't consistent in thickness or the base beneath it wasn't flat. The fix is to pull up the affected pavers, re-screed the sand to a uniform depth, and reset them. If the problem covers a large area, check whether the base gravel itself is uneven and needs regrading before you add sand.
Settling and sunken spots
Sunken areas after installation almost always mean the base wasn't compacted well enough, or water has been washing fine material out of the base over time. For a small sunken zone, lift the pavers in that area, add or correct the base material and sand, re-compact as much as you can, and reset the pavers. This spot-repair approach works well for isolated issues. If large sections of the patio are sinking or pooling water repeatedly, that's usually a sign that the base or drainage problem is deeper than a surface fix can address, and it may be time to get a professional assessment.
Pavers shifting or spreading at the edges
This one almost always means the edge restraints were skipped, installed too shallow, or the spikes weren't driven far enough into solid base material. If outer pavers are creeping outward, the restraint isn't holding. Pull the edge restraints, reinstall them tightly against the paver edge, and drive new spikes into a solid area. Make sure you're spiking into compacted base material, not loose backfill.
Poor drainage and pooling water
If water pools on the patio surface after rain, the slope wasn't set correctly during layout, or it was set correctly but the base didn't follow the same grade. This is genuinely hard to fix after the fact without pulling up the entire patio and regrading. The best prevention is measuring your slope carefully during the layout and string-line stage, and checking the grade of your compacted base before adding sand. A 1/4-inch-per-foot slope sounds small, but it's the difference between a patio that drains cleanly and one that becomes a puddle. For patio cinder block steps, use the same string-line slope and solid edge restraint approach so the steps stay level and drain correctly over time 1/4-inch-per-foot slope.
Weeds in the joints
Weeds growing between pavers are a sign that joints weren't filled with polymeric sand, or the sand was applied incorrectly and didn't activate properly. Regular dry sand will wash out and become a growing medium for weeds and moss within a season or two. If you've got an existing patio with weed issues, clear out the old joint material, let everything dry completely, and apply polymeric sand correctly. It won't prevent all weed growth forever, but it dramatically slows it down compared to leaving joints open or using regular sand.
One last thing worth saying: the preparation stage, meaning excavation, subgrade compaction, and base layers, takes more time than setting the actual pavers. If you find yourself spending two-thirds of your project time on site prep and only a few hours on actually placing blocks, you're doing it right. The pavers are just the visible surface; the work underneath is what makes the patio last.
FAQ
What thickness of pavers or blocks should I choose for my patio?
It usually depends on what the patio will support. For normal foot traffic, 2 3/8 inch concrete pavers are fine. If you plan to park a car or expect heavy loads, use thicker pavers (for example 3 1/8 inch) and confirm your base is strong enough, since inadequate base stiffness can cause settlement even with thicker units.
Can I build a block patio over old concrete or another hard surface?
You can lay pavers over existing concrete only in limited cases where the surface is stable, well-drained, and you can still achieve the required slope and depth for bedding sand and paver thickness. Most of the time, you will need to remove the concrete so you can compact a new base and build the correct drainage profile.
What sand should I use under the pavers, and how thick should it be?
Prefer coarse concrete sand for the bedding layer, then screed to a true 1 inch depth. Avoid fine mason sand or play sand, they tend to shift more under load and can lead to uneven walking surfaces.
Can I raise the patio higher than the original grade and still build it correctly?
Yes, but only if you address slope and height. You still need excavation, base compaction, bedding sand, and a consistent drainage grade, then the entire stack of materials must “fit” the same finished elevation. If you skip excavation depth planning, the patio can end up too high against doors or too low to drain.
When is polymeric sand the right choice, and when should I apply it?
For most DIY patios, polymeric sand should be used only after the pavers are set, the surface is clean, and the patio is dry. Wetting, heavy sweeping, or activating too early can cause the joints to wash out or haze on the surface.
What should I do if polymeric sand leaves a haze on the pavers?
If you get polymeric haze, it usually means product was left on the paver faces and activated. Wait for full cure (often about 24 hours), then clean with a manufacturer-recommended paver-safe method. The key is prevention next time: remove excess sand thoroughly before misting.
How do I accurately calculate how many pavers or blocks I need?
Do a couple of dry runs before mixing anything or ordering materials. A quick method is to estimate area times paver coverage, then add waste for cuts and breakage (about 5% for straight running bond, 10 to 15% for angled patterns). Also account for additional pieces needed around borders, edging, and irregular areas.
Do I always need geotextile fabric under the gravel base?
It depends on the soil and your drainage plan. On sandy or loamy soil that drains well you can often skip fabric. On clay or expansive soils, adding geotextile between subgrade and gravel helps reduce fine soil migration that leads to settlement and uneven pavers.
How should I compact the gravel base, and what mistake should I avoid?
You usually need to compact in lifts, not all at once. Spread gravel in about 3 to 4 inch layers, compact each layer, then add the next. The goal is a rock-solid base that does not deflect under foot pressure, and the base should already reflect the drainage slope.
How can I keep my block or paver lines straight while I’m installing?
Check alignment frequently as you set pavers, especially if you are doing a pattern with many cuts. Use a chalk line or straightedge every few rows to keep rows straight and spacing consistent, then tap down individual units with a rubber mallet rather than pushing or sliding them into place.
What if some pavers end up higher or lower than the rest?
Yes, and the best approach is to correct height immediately. If a paver is more than about 1/8 inch higher or lower than neighbors, lift it, adjust the sand, and reset. Fixing it as you go prevents a “stacking error” that becomes harder to correct later.
What should I do if my design leaves very small cut pieces at the patio edge?
Plan for edge and access pieces. Don’t leave tiny “sliver” cuts at the border, smaller than about one-third of a paver can crack under traffic. If your layout produces slivers, shift the layout slightly so edge cuts are larger and more durable.
How do I prevent the patio from heaving or shifting in winter?
For freezing climates, edge restraints and correct drainage are the biggest protections. Make sure restraints are installed tightly, spiked into compacted base, and that the surface drains away from the house at about 1/4 inch per foot to avoid freeze-thaw damage caused by trapped water.
How do I fix sinking or rocking pavers after the patio is finished?
If an area is rocking, wavy, or uneven, the most reliable fix is to lift the affected pavers, correct base or bedding sand issues, re-screed to consistent thickness, re-compact the base, and reset. Spot repairs work best when the issue is localized, but if multiple sections are sinking or pooling, you may need base or drainage redesign.