You can build a solid, long-lasting patio with concrete blocks by digging out the area to the right depth, compacting a crushed stone base, laying a sand bedding layer, setting the blocks in your chosen pattern, and locking everything in with edge restraints and polymeric sand. Done correctly, the whole project is very manageable for a first-time DIYer over a weekend or two. Done poorly, mostly because of a bad base or no drainage plan, and you'll be pulling up blocks within a couple of seasons. The steps below walk you through the whole process so you end up with something that actually stays flat and weed-free.
How to Build a Patio With Patio Blocks: DIY Guide

Clara Farrell
7 Jun 2026
Planning and Block Selection
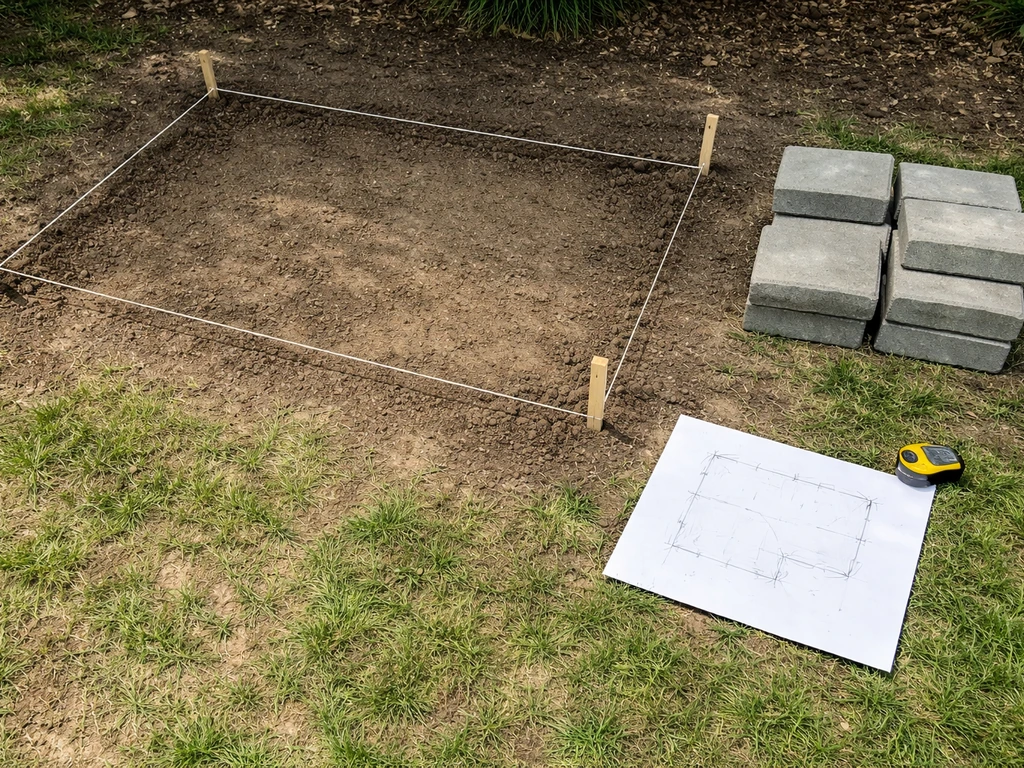
Start with a rough sketch on paper. Measure the space you want to cover, mark it out with stakes and string, and decide on a shape. Rectangular and square patios are the easiest because you'll deal with minimal cutting. Once you know the square footage, you can figure out how many blocks you need.
For a typical backyard patio, standard concrete paving blocks (also called pavers or patio blocks) run about 2-3/8 inches thick, which is roughly 60 mm. That thickness is designed for pedestrian foot traffic and meets the kind of performance standards used across the industry for residential patios. You'll find them in sizes like 4x8 inches, 6x6 inches, and 6x9 inches. Larger format blocks, say 12x12 or bigger, look great but they're heavier to handle and harder to level individually.
When choosing your block, think about three things: thickness (stick with at least 2-3/8 inches for a patio), surface texture (tumbled or brushed surfaces hide minor imperfections better than smooth), and color consistency across batches. Buy all your blocks from the same production run if possible, because dye lots can vary noticeably.
Also decide on your laying pattern before you buy. A simple running bond (like brickwork) is the easiest and works well structurally. Herringbone is more complex but gives the patio a more interlocked, stable feel, especially if you ever expect a heavy load on it. Basketweave is easy to lay but doesn't interlock as tightly. Your pattern affects how much cutting you'll need, which matters at the edges.
| Pattern | Difficulty | Stability | Cutting Required |
|---|---|---|---|
| Running Bond | Easy | Good | Edges only |
| Basketweave | Easy | Moderate | Edges only |
| Herringbone (45°) | Moderate | Excellent | Many edge cuts |
| Pinwheel | Moderate | Good | Some edge cuts |
Tools, Materials, and Block Layout
Gather everything before you start. Making a mid-project run to the hardware store when you're covered in gravel and the base is half done is frustrating and wastes time.
- Concrete patio blocks (add 5-10% extra for cuts and breakage)
- Crushed stone or gravel for the base (usually 3/4-inch clean crushed stone)
- Coarse bedding sand (not fine play sand)
- Polymeric sand for the joints
- Landscape fabric or geotextile (optional but useful in clay or wet soils)
- Plastic or steel edge restraints with spikes
- Rubber mallet
- Plate compactor (rent one, don't skip this)
- Hand tamper (for tight spots the compactor can't reach)
- Screed board and screed rails or pipes
- Level and long straightedge (at least 6 feet)
- Stakes and mason's string
- Tape measure
- Shovel, pickaxe, and wheelbarrow
- Circular saw with diamond blade or a rented paver splitter for cuts
- Safety glasses and work gloves
- Garden hose with spray nozzle
Once you have your blocks, dry-lay a small section before committing. This lets you check spacing, confirm the pattern looks how you imagined, and identify any sizing inconsistencies between blocks. Most patio blocks are designed with small built-in spacer nubs, which give you a consistent 1/8-inch joint automatically. If yours don't have them, use plastic spacers.
Site Prep and Excavation Basics
This is the step most people underestimate, and it's where most patio failures actually begin. A patio that shifts, heaves, or holds water almost always traces back to inadequate site prep, not the blocks themselves.
First, call 811 (in the US) before you dig. This is the "call before you dig" service that marks underground utilities for free. Don't skip it. Once you're clear, mark your patio outline with stakes and string, then spray-paint the outline on the ground for a clear digging guide.
Now figure out how deep you need to dig. Your total excavation depth equals: base layer + bedding sand layer + block thickness. For a standard residential patio, that works out like this: 4 to 6 inches of compacted crushed stone base, plus 1 inch of bedding sand, plus roughly 2-3/8 inches of block. That puts you at a minimum of 7 to 9-1/2 inches of total excavation depth. In areas with harder winters or clay-heavy soil, go toward the deeper end of that range, closer to 8 to 10 inches.
Dig out the entire area, removing all grass, roots, and organic material. Organic material compresses over time and causes settling, so it all has to go. Once you're at depth, use a hand tamper or plate compactor to firm up the native soil (the subgrade). If you hit soft or spongy spots, dig them out and backfill with crushed stone.
If you're working with clay soil, this is where a geotextile fabric layer really earns its keep. Lay it directly on the compacted subgrade before adding your base material. It separates the clay from your crushed stone so the fine particles don't migrate up into the base over time and undermine your drainage. This is especially worth doing if you're in an area that gets a lot of rain or has high groundwater.
Slope is also something to plan for now, not later. Your patio needs to drain water away from your house. Aim for a slope of 1/8 to 1/4 inch per foot, sloping away from any structure. Set your string lines at that angle from the start so everything you build from here follows the right grade.
Building the Base and Compaction for Drainage
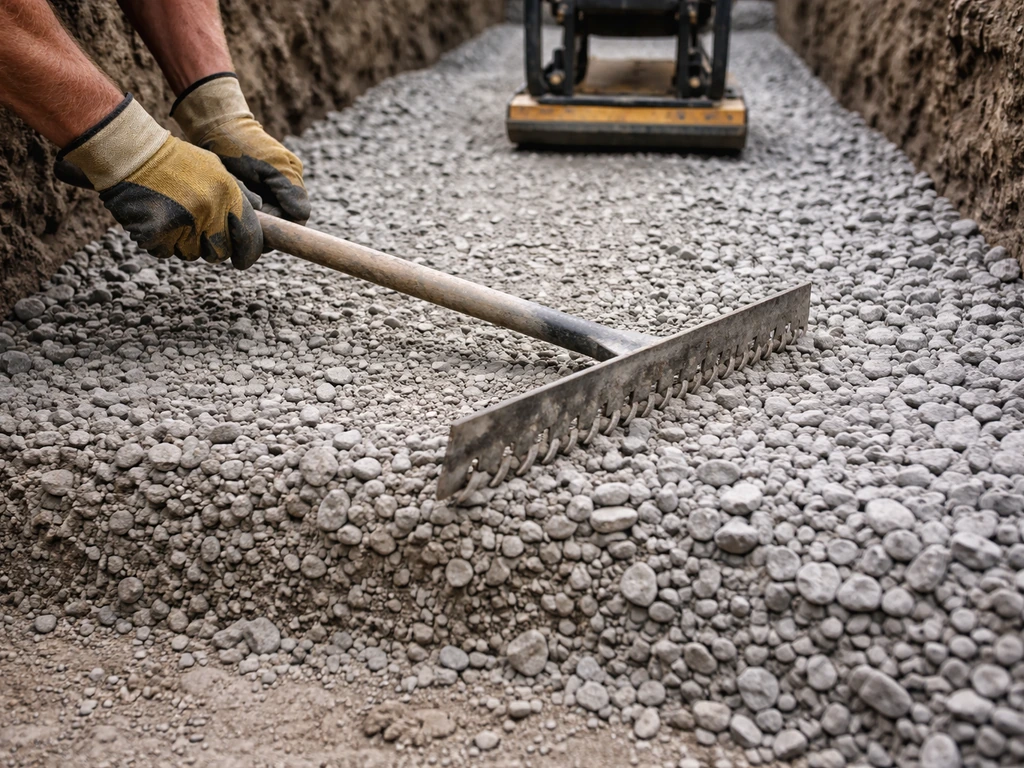
The base is the foundation of the whole project, and compaction is what makes it actually work. Dumping 6 inches of gravel into the hole and calling it done isn't enough. You need to compact it in layers.
Add your crushed stone in 2 to 3-inch lifts (layers), compacting each lift with the plate compactor before adding more. This is what creates a stable, interlocked base that won't settle under load. A single thick layer of stone dumped in and tamped once won't compact uniformly, and you'll see dips appear in your patio after the first winter. Run the plate compactor across the full area in overlapping passes, then do another set of passes at a 90-degree angle. When you're done, the surface should feel very firm and barely give when you stand on it.
For most residential patios, 4 inches of compacted crushed stone is the minimum. In cold climates, 6 inches is safer, because a thicker base is more frost-resistant. If you're building in an area with poor drainage or you're dealing with a slight slope (which you should be), make sure your crushed stone itself drains well. Clean crushed stone, meaning no fine material or clay mixed in, drains far better than "crusher run" which packs tight but holds water.
Once your base is compacted and at the right grade, add one inch of coarse bedding sand across the entire area. Don't compact the sand. Its job is to give you a fine-tunable surface to set and level individual blocks. Use screed rails (you can use metal pipes as guides) to drag a screed board across the sand and create a perfectly flat, uniformly thick layer that follows your drainage slope. This is a satisfying step when it goes right.
Installing and Leveling Concrete Blocks
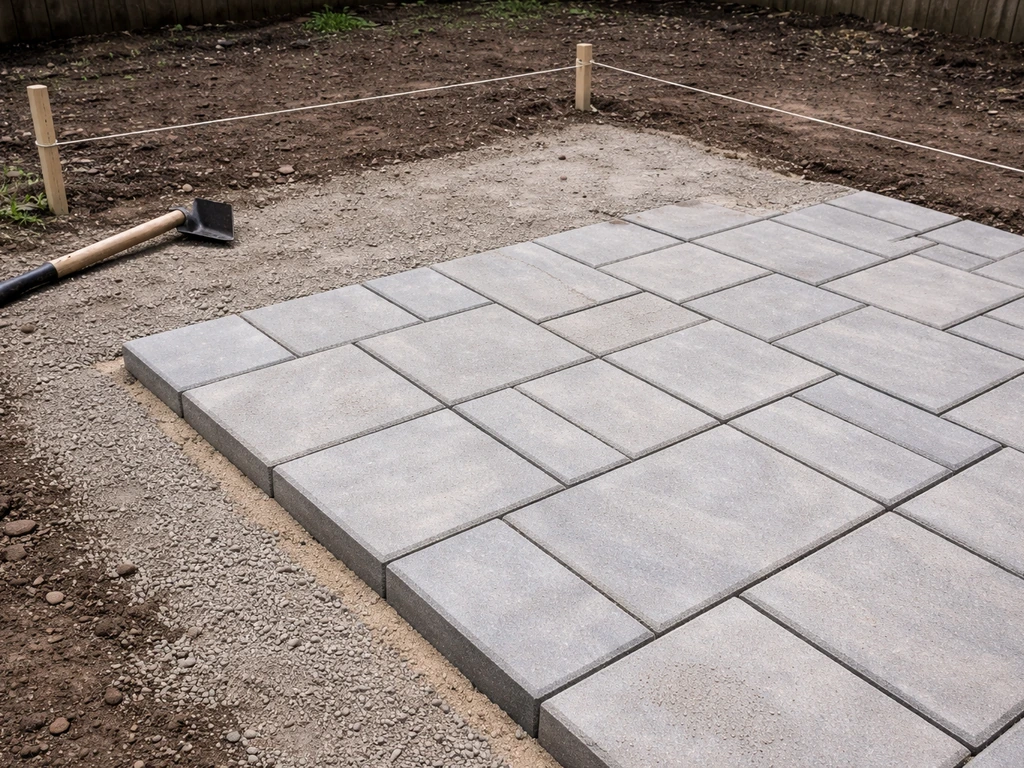
Start laying blocks from one corner, working outward. If you're wondering specifically how to build a patio with cement blocks, follow the same base, leveling, and jointing steps, then choose a block type and pattern that fits your space and load concrete blocks. The classic approach is to start at a right-angle corner and work in an L-shape across the patio. This keeps your lines straight and gives you a reference edge to work from.
Set each block by placing it gently onto the sand (don't slide it, which disturbs the bed) and tapping it down firmly with a rubber mallet. Check your level constantly, both along each block individually and across every three to four blocks. The goal is a surface that's uniformly flat with a consistent drainage slope. To help you plan your layout, see how to build patio cinder block steps for clean lines, stable support, and proper drainage surface that's uniformly flat. If you are planning patio block steps, use the same base and drainage principles, but pay extra attention to riser height and stable edging. If a block is high, pull it up and scrape a little sand away. If it's low, add a pinch of sand underneath. Don't try to fix height by hammering harder.
Keep your pattern lines straight by occasionally stretching a string line across the patio and checking that your joint lines are tracking correctly. Blocks can drift over a large area, and catching it early is much easier than trying to correct it after you've laid 50 more blocks.
Work from the blocks already laid onto a kneeling board or piece of plywood. Never kneel or walk directly on freshly set blocks, because you'll disturb the sand bed and your carefully leveled surface.
Once all full blocks are placed, run the plate compactor over the entire surface to seat the blocks firmly into the sand. Use a rubber pad or piece of carpet under the plate compactor so it doesn't scratch or chip the block surfaces. This vibration step is what really locks everything together.
Cutting, Edging, and Jointing
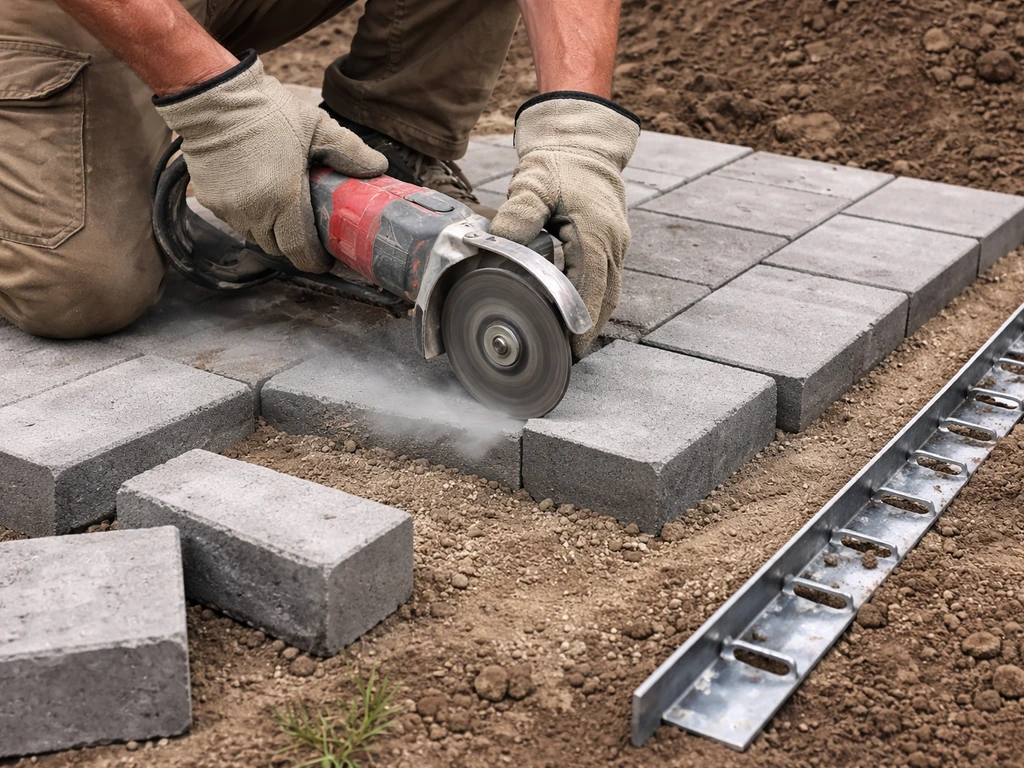
After all the full blocks are placed and compacted, fill in the edges with cut pieces. Measure each gap individually rather than assuming they're all the same size, because small inconsistencies add up. Use a circular saw with a diamond-tipped paver blade or a rented hydraulic splitter. A splitter is faster and doesn't generate dust, but a diamond blade gives cleaner cuts on complex angles. Always wear eye protection and a dust mask when cutting.
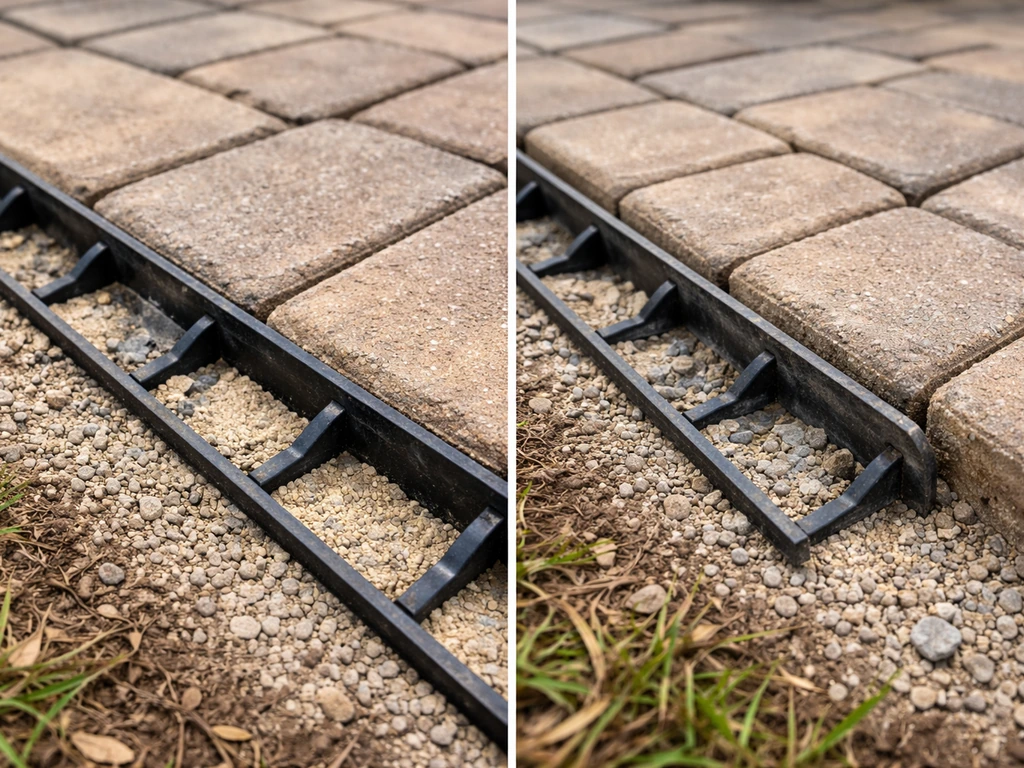
Edge restraints go in before you do the final joint sand. These are plastic or steel edging sections that spike into the compacted base around the perimeter of the patio. Without them, your outer blocks have nothing holding them and they'll slowly creep outward over time, opening up gaps throughout the entire surface. This step gets skipped more than almost anything else in DIY patio builds, and it's almost always regretted. Drive the spikes every 12 inches for a solid hold.
With edging in place, spread polymeric sand across the entire patio surface. Polymeric sand is a blend of sand and polymer binders that, when activated with water, hardens to lock the joints. It's far better than plain sand because it resists washing out in rain, discourages weed growth, and deters insects from nesting in the joints. Sweep it into all the joints with a stiff broom, making multiple passes in different directions. Blow off or sweep away any excess from the block surfaces, then mist the patio with water to activate the binders. Let it cure for 24 hours before walking on it.
Finishing, Sealing, and Keeping It Looking Good
Once the polymeric sand has cured, do a final walk-over. Check for any blocks that feel slightly high or low and correct them if needed (you can still pull individual blocks up, adjust the sand, and reset them at this point). Sweep up any remaining sand or debris.
Sealing is optional, but it's worth doing if you want to protect the surface color, reduce staining, and add a little extra resistance to weed growth in the joints. Use a paver-specific sealer, not a generic concrete sealer. Apply it with a pump sprayer or roller according to the product instructions, usually in two thin coats. Let the patio dry fully for at least 48 hours after the polymeric sand cure before you apply sealer. Sealed patios generally need re-sealing every 2 to 4 years depending on traffic and weather exposure.
Common Problems and How to Avoid Them
Even experienced builders run into issues. Here are the most common ones and what to do about them.
- Blocks shifting or spreading: Almost always caused by missing or inadequately spiked edge restraints. Fix it by installing proper restraints and resetting the affected blocks.
- Uneven surface with high and low spots: Usually a base compaction problem, or the bedding sand layer wasn't uniform. Prevention is the fix here, but you can pull up sections and redo the base.
- Poor drainage and water pooling: Slope wasn't established correctly during excavation. The fix is painful (it means re-grading), which is why getting your string lines right before you dig saves enormous headaches.
- Weed growth in joints: Plain sand joints are the culprit. Retrofit with polymeric sand by cleaning out the existing joints, re-sweeping with polymeric sand, and activating with water.
- Frost heaving in cold climates: A base that's too shallow or retains water will freeze and push blocks up. A 6-inch compacted stone base with good drainage is your best defense.
- Blocks cracking: This can happen if the subgrade has soft spots that weren't corrected, or if the blocks are being used for vehicular traffic they weren't rated for. Check your subgrade carefully during prep.
When to Call a Pro
Most backyard patio projects are very doable as a DIY job. But there are a few situations where it's worth getting professional input: if your yard has significant slope changes that need a retaining wall or raised structure (a different and more complex project), if you have chronic drainage problems around the foundation of your house, or if you're working on a very large area where renting a full-size plate compactor and screeding accurately becomes genuinely difficult without experience. If you need to build a raised patio with retaining wall blocks, you’ll follow a more detailed sequence for walls, backfill, and drainage retaining wall or raised structure. For anything involving a raised or terraced patio with retaining structures, the scope goes well beyond a standard block installation.
Your Next Steps Right Now
- Measure your patio area and sketch out the shape today.
- Calculate your block count (square footage divided by the square footage of one block, then add 10%).
- Call 811 to schedule utility marking before any digging.
- Calculate excavation depth: 4-6 inches base + 1 inch sand + block thickness.
- Rent a plate compactor for the day you plan to prep and again for the day you set blocks.
- Order crushed stone, bedding sand, polymeric sand, and blocks from a local supplier (buying from a single batch).
- Set your string lines with the correct slope (1/8 to 1/4 inch per foot away from your house) before any digging starts.
A concrete block patio built on a proper base will easily last 20 to 30 years with minimal maintenance. The two days you spend getting the base right are the most valuable days of the whole project. Everything sitting on top of a solid, well-drained base almost takes care of itself. If you are wondering how to install block patio surfaces, focus on drainage first, then set the blocks carefully on a properly prepared base and bedding sand.
FAQ
Can I build a patio with patio blocks without crushed stone, like using gravel or sand only?
You can, but it usually leads to uneven settling. The stable layer is compacted crushed stone in lifts, then a thin bedding sand layer for leveling. If you substitute gravel with fines or use sand as a primary base, it tends to pump during freeze-thaw or after heavy rain, which makes blocks rock or dip within a season or two.
What if I accidentally dig too deep or the base ends up lower than planned?
Fix it by restoring thickness with more compacted crushed stone, not by adding extra sand under the blocks. Bedding sand should stay about 1 inch, because sand alone cannot provide the same load resistance as the compacted base. Re-check your finished height against the door thresholds and slope lines before you lay blocks.
How much slope is “enough” to make the patio drain properly?
Use the article’s target range (about 1/8 to 1/4 inch per foot away from the house) and verify it over the whole run, not just near the start. Measure at multiple points as you set grade strings, because small math or string-line mistakes can create localized low spots where water ponds.
Should I compact the sand bedding layer?
No. Compacting the bedding sand makes it too dense and hard, which can prevent blocks from seating evenly during leveling. Instead, screed it smooth to consistent thickness, set blocks by tapping into place, then compact the surface only after blocks are fully laid using a plate compactor with a protective pad.
Do I need to remove grass and roots even if I’m using geotextile fabric?
Yes. Geotextile helps keep subgrade fines from migrating, but it does not stop organic material from breaking down and compressing. Remove all turf, roots, and soft organic material, then compact the subgrade so the base sits on firm, consistent ground.
What is the best way to avoid rocking blocks when I set them?
If a block rocks, pull it up and correct the bedding sand thickness, then reset it. Don’t try to fix rocking by tapping harder, because you can disturb neighboring blocks and create a wavy surface. After the first small area, stop and verify level across several blocks before you continue.
How tight should the joints be between patio blocks?
Follow the spacer nubs built into your units, if present, since they create a consistent joint size. If your blocks lack spacers, use plastic spacers to match the intended joint width; joints that are too wide or too narrow can affect how well polymeric sand locks and can increase edge cracking.
Can I use regular sand instead of polymeric sand?
You can for short-term aesthetics, but it’s more likely to wash out and let weeds appear. Polymeric sand is specifically designed to resist rainfall-driven joint loss once activated. If you do use regular sand, expect more frequent re-sanding and more ongoing weed control.
How do I know whether my polymeric sand needs more than one misting or a longer cure time?
Only activate according to the product instructions, because different polymer chemistry reacts differently. Generally, apply water lightly and evenly after sweeping joints full, avoid puddling, then let it cure before walking on the surface. If joints don’t harden after the stated cure window, you may need a controlled spot re-application rather than repeatedly over-wetting.
Is it okay to walk on the patio before the polymeric sand cures?
It’s risky. Foot traffic can dislodge sand in the joints before it bonds, which later shows up as washouts and weed growth. Wait the full cure period recommended by the polymeric sand, commonly around 24 hours, then do a careful final sweep and check for any loose joints.
What should I do if I’m missing an edge restraint or it seems too late to install one?
Edge restraints matter most for perimeter stability. If you already laid most blocks, you may still need to lift sections at the edges, install the edging into the compacted base, then reset the blocks. Skipping or under-spacing the perimeter restraints often causes creeping outward and widening gaps.
How far apart should I place edge restraint spikes?
A common rule is about 12 inches on center, but follow the edging manufacturer’s spacing if it differs. If your soil is loose or your patio sees frequent thermal movement, slightly tighter spacing within the recommended range can improve long-term edge stability.
What cutting tools work best, and how do I reduce chipping?
Use a circular saw with a diamond paver blade for most straight cuts, or rent a splitter for clean, fast straight cuts. To reduce chipping, set the correct blade direction for your unit, mark the cut line clearly, and use eye protection and a dust mask. Also, dry-fit the cut pieces first so you don’t lose time adjusting joint widths later.
Can I build a patio over existing concrete or old pavers?
Usually not. You need uniform subgrade support and correct excavation depth for the base plus bedding plus block thickness and slope. If you install on top of old surfaces, you often end up with inadequate base depth, poor drainage, and uneven settlement that shows up as rocking or humps.
When should I avoid DIY and get professional help?
Get input if you have major drainage or grading issues near the house, a yard with significant slope changes that require a raised structure or retaining wall, or if the patio area is large enough that maintaining consistent screed thickness and slope becomes difficult without specialized equipment. These situations affect water management and load stability, which are the main failure points.
How often should I seal a patio with patio blocks?
Sealing is optional, but if you do it, plan on re-sealing every 2 to 4 years depending on sun exposure, rainfall, and foot traffic. If you notice surface color loss or increased staining, it’s a sign the sealer has worn. Use a sealer made for pavers, and allow full curing after polymeric sand before sealing.