You can absolutely build a raised patio on a slope using retaining wall blocks, and it will last for decades if you get three things right: proper drainage behind the wall, solid compaction of every base layer, and a stable footing trench. Everything else is just sequencing those steps correctly. This guide walks you through the whole project from measuring and planning, through digging and building the wall, to laying your patio surface on top. If you still need the full walkthrough, follow a dedicated guide on how to install a block patio from planning to final paver placement how to install block patio.
How to Build a Raised Patio With Retaining Wall Blocks

Clara Farrell
3 Jul 2026
Planning and measuring before you dig anything
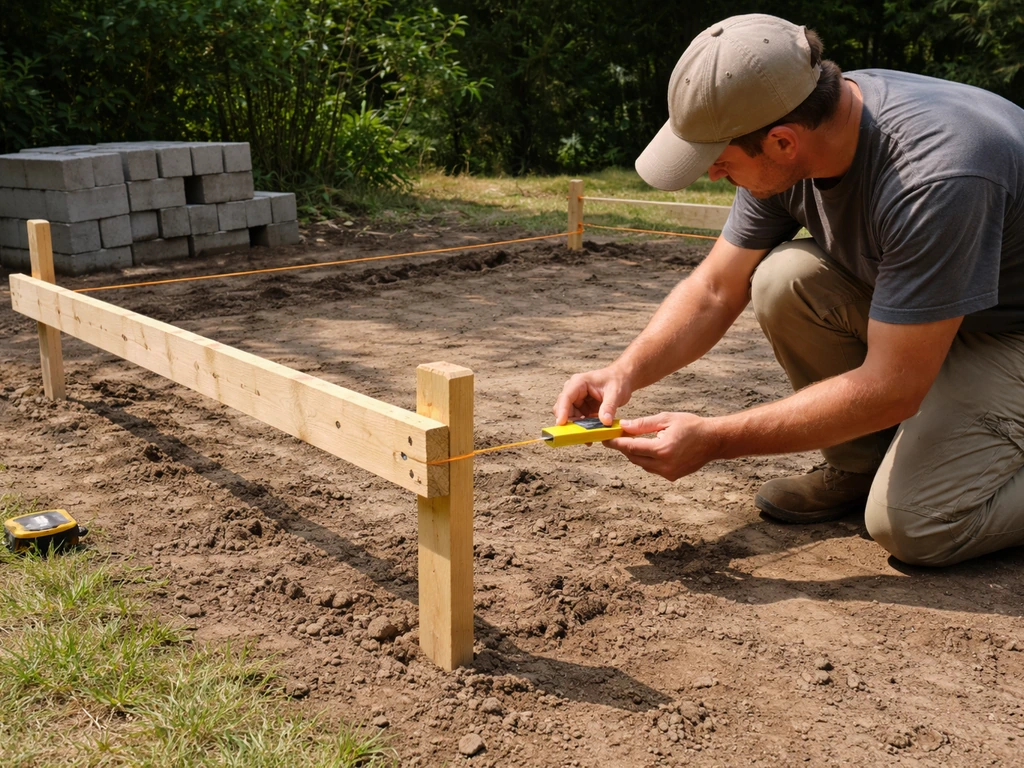
Start by staking out the finished patio footprint with string lines and batter boards. Measure the length and width you want, then use a line level or a 4-foot level on a long straight board to find out exactly how much your yard drops across that area. That elevation change is your retained height, and it drives every other decision on this project. If your yard drops 24 inches across the patio area, you need a wall that holds back roughly 24 inches of soil (plus whatever you add as fill).
Retained height also determines how many courses of block you need. Most standard segmental retaining wall (SRW) blocks are 6 to 8 inches tall. Divide your total retained height by the actual block height to get your course count. A 24-inch retained height with 6-inch blocks means four courses above grade, plus one buried base course. Always bury at least one full course as a footing, so plan for that from the start.
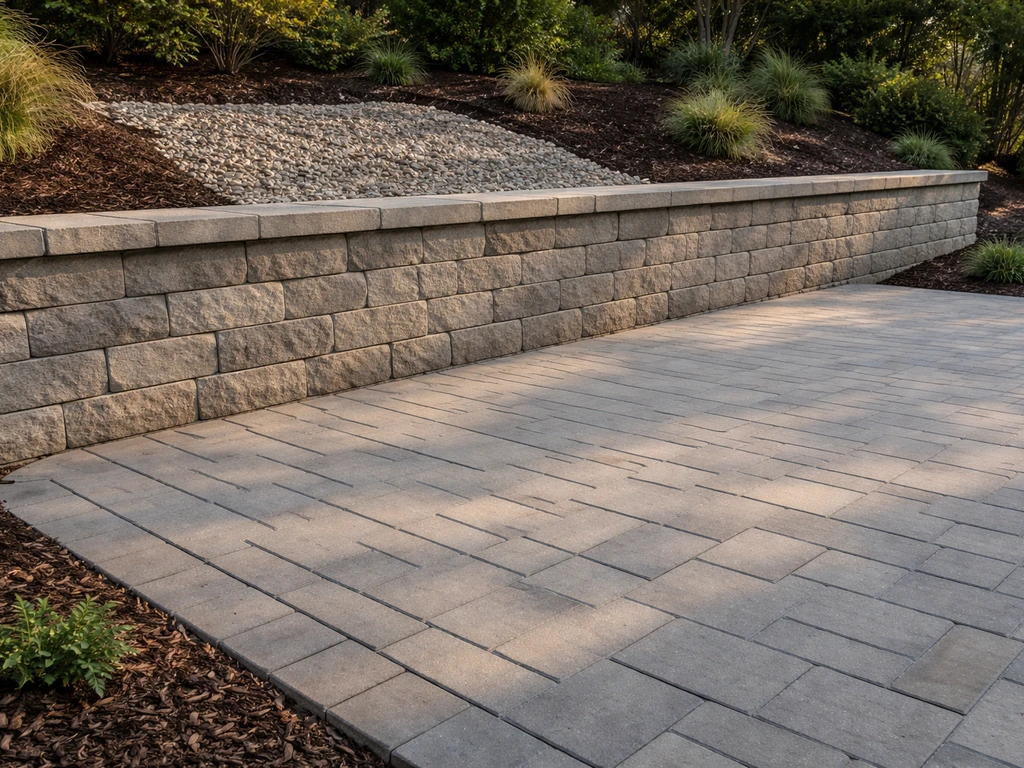
When you're choosing blocks, stick to blocks that are designed for retaining walls, not just decorative garden edging. Retaining wall blocks like those from Allan Block, VERSA-LOK, or Techo-Bloc have a setback (batter) engineered into them and often have hollow cores or pin/interlock systems that tie courses together. For the patio surface on top, you can use concrete pavers, natural stone, or any material you'd use for a flat patio build. For the patio surface on top of the blocks, you can use pavers, natural stone, or other flat-surface materials that fit your patio design flat patio build. Matching the cap block style to your wall block gives the whole project a finished, intentional look.
Before you finalize your plan, sketch a simple cross-section drawing showing the wall height, the depth of the footing trench, the drainage aggregate zone behind the wall, the geotextile wrap, and the patio base layers on top. You don't need CAD software, just a pencil and graph paper. That drawing becomes your reference during construction and is also what you bring to the permit office if required.
Materials and tools checklist
- Retaining wall blocks (calculate square footage of wall face plus 10% waste)
- Cap blocks or adhesive-set finish blocks for the top course
- Angular drainage aggregate (clean crushed stone, 3/4-inch minus, no fines)
- Compactable gravel base (road base or crushed aggregate) for patio sub-base
- Coarse concrete sand or chip stone screenings for paver bedding layer
- Geotextile filter fabric (non-woven, lightweight drainage type)
- Perforated drain pipe (4-inch diameter, slotted) and drain outlet
- Concrete pavers or natural stone for the patio surface
- Plastic or metal edge restraints with spikes
- Polymeric jointing sand
- Plate compactor (rent if you don't own one)
- Tamping bar and hand tamper for tight spots
- String lines, batter boards, line level or laser level
- Masonry adhesive (for cap blocks and any cut pieces)
- Rubber mallet, chisel or block splitter, tape measure, speed square
- Shovel, pickaxe, wheelbarrow, and a good pair of work gloves
Site prep: excavation, subgrade, and drainage
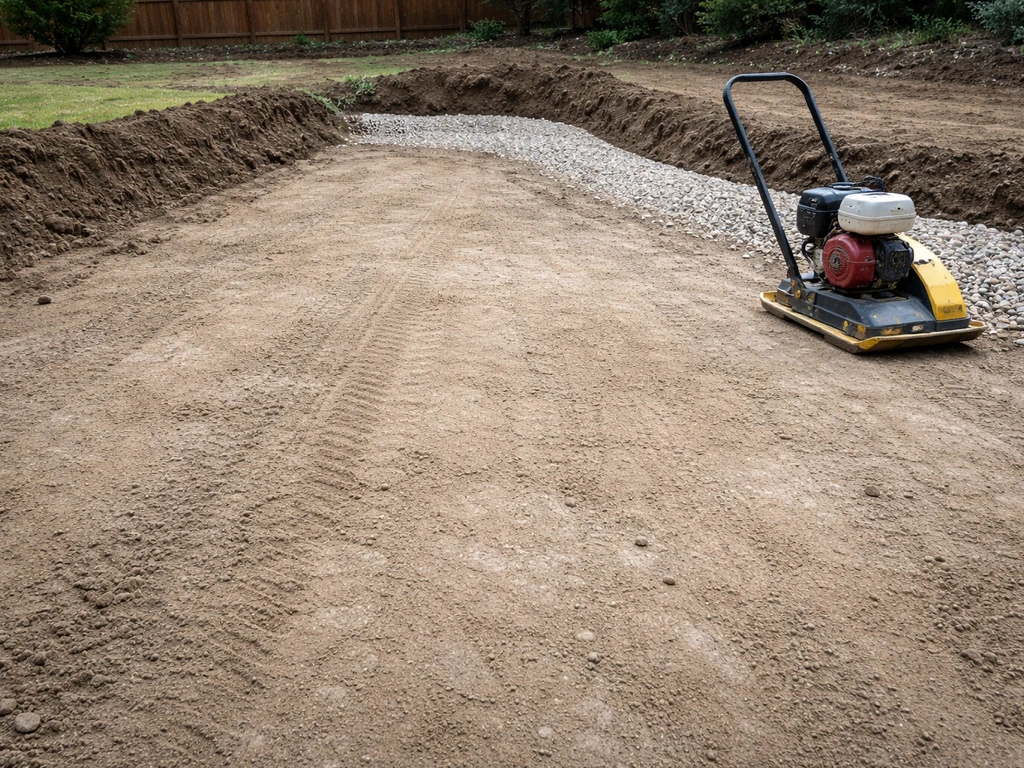
Strip the topsoil from the entire project area first. Topsoil is organic, it compresses, and it's the number one reason raised patios settle and tip over time. Dig down at least 6 inches below your planned finished base elevation for the patio area, and deeper at the wall footing location. For the footing trench, you need to remove enough soil to bury one full block course plus a 4 to 6 inch compacted gravel base beneath the block. On most residential projects that means digging down 12 to 18 inches below existing grade at the wall line.
The subgrade (the native soil you're building on) needs to be firm. Press a screwdriver or rebar into the exposed soil with moderate hand pressure. If it goes in more than an inch or two, you're dealing with soft or loose material and it needs to be compacted or excavated and replaced with compactable fill before you lay any block. In clay-heavy soils, this step matters even more because clay holds water and moves with freeze-thaw cycles.
Drainage is the part most DIYers underestimate. Water that builds up behind a retaining wall creates hydrostatic pressure, and that pressure is what eventually bows or topples walls. Before you place a single block, think about where water behind your wall will go. The ground behind the wall needs to drain away, not toward the wall. You'll set up the drainage aggregate zone and drain pipe during the block-laying phase, but you need to plan the outlet location now, before you start building.
Building the retaining wall: block by block
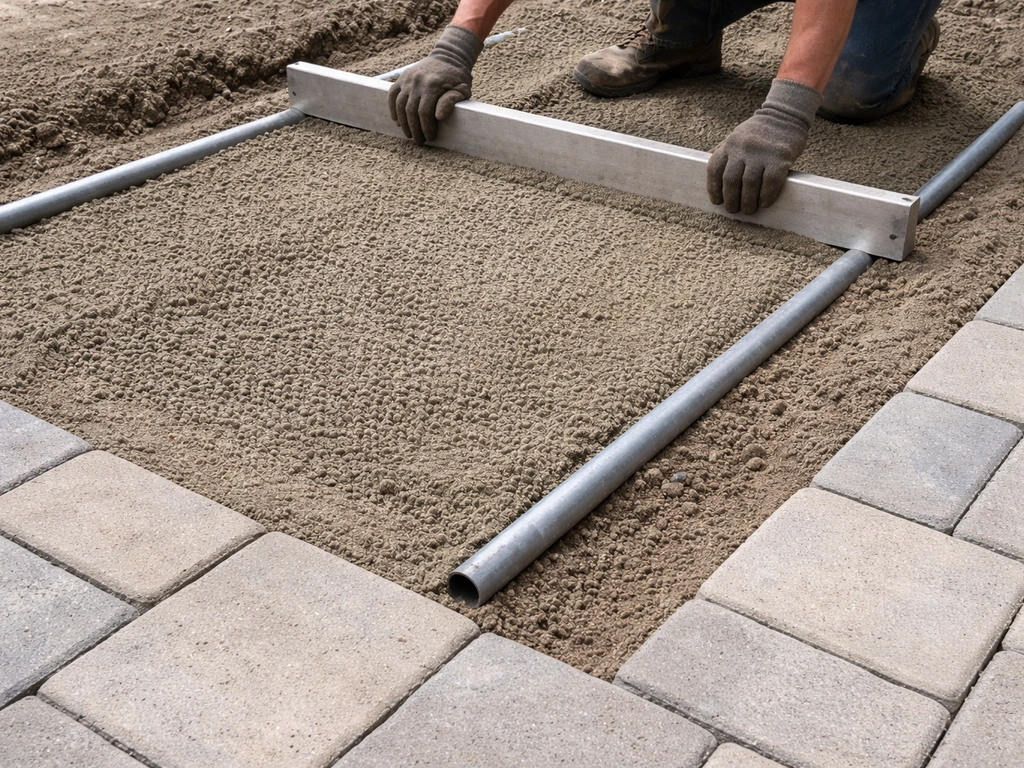
Lay a 4 to 6 inch base of angular compactable gravel in the footing trench and compact it thoroughly with a plate compactor. You want this layer firm and level across the full length of the wall. Check it with a level in both directions. This base course sets the alignment for everything above it, so take your time here.
Setting the base course
Set the first (base) course of block on the compacted gravel, burying it completely or at least to within an inch of existing grade. This buried course provides the footing stability and resists sliding forces. Keep it dead level across the length and check for level front-to-back as well. Most retaining wall blocks have a slight rear setback built in, so stacking them flush front-to-front automatically creates the engineered batter (lean-back) that keeps the wall stable. Don't fight that geometry. Fill the hollow cores of the base course blocks and the 12 inches of space directly behind them with clean drainage aggregate, just as Allan Block's installation guidance specifies.
Stacking courses and building the drainage zone
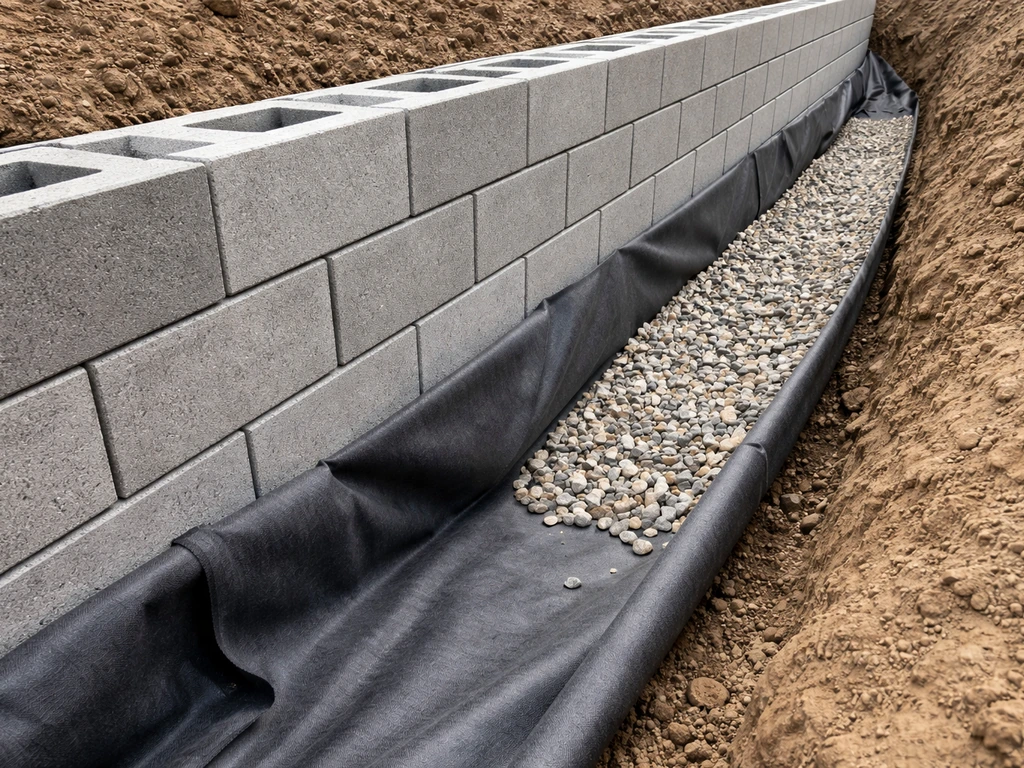
Before you start stacking, lay your geotextile filter fabric in the trench and up the back face of the wall location. The fabric acts as a barrier that allows water to pass through while keeping soil fines from migrating into and clogging your drainage aggregate. Techo-Bloc's installation guidance specifically calls out wrapping geotextile around the ends of the perforated drain pipe too, for the same reason. This step is easy to skip and very hard to fix later, so do it.
Stack each course in a running bond pattern, offsetting the vertical joints by half a block length. This ties the wall together and dramatically increases lateral strength compared to stacked joints. After every course, fill and compact the drainage aggregate behind the blocks in lifts. [VERSA-LOK recommends placing and compacting 12 inches of drainage aggregate directly behind the wall units.
](https://www. versa-lok. com/homeowner/installation-tips) Don't dump all the aggregate in at once. Add it in 6 to 8 inch lifts and compact each lift before adding more.
Allan Block's commercial installation specs call for compacting backfill to 95% of Standard Proctor density (ASTM D698), which is the engineering standard for solid, stable fill. You won't be testing density in your backyard, but what it means practically is: use a plate compactor, make multiple passes, and don't move on until the surface doesn't move under the machine.
For walls over 3 feet tall, install a 4-inch perforated drain pipe at the base of the drainage aggregate zone, behind the first above-grade course. This is a VERSA-LOK standard recommendation and it's one I'd follow regardless of brand. Run the pipe to a daylight outlet at the end or side of the wall where water can exit freely. Wrap the pipe ends in geotextile sock to prevent clogging. Without this pipe, water has nowhere to go during heavy rain and pressure builds fast.
Finishing the wall top
The top course of your wall is the cap layer. Use your block manufacturer's cap blocks and adhere them with a construction-grade masonry adhesive. The cap blocks lock the top course in place, protect the hollow cores from water intrusion, and give the wall a finished appearance. Once the cap course is set, fold the top of your geotextile over the drainage aggregate to close off the zone before you add any topsoil or patio base fill behind and above the wall.
Creating a stable patio base over the raised area
With the wall complete, you now fill the raised area inside the wall with your patio sub-base material. Cinder block steps built on a properly designed retaining wall and compacted base can create a durable patio approach without settling or heaving patio sub-base material. Use compactable road base or 3/4-inch clean crushed aggregate, not topsoil or organic fill. Fill in 4 to 6 inch lifts, compacting each lift fully before adding the next. This is the most physically demanding part of the project, but it's also the most important. A poorly compacted base is the direct cause of pavers cracking, sinking, or going uneven within a year or two.
Build up the base layers until you're 3 to 4 inches below your target finished patio height. Once your block wall is holding back the retained height, you can follow the same patio-base steps to build a patio with cement blocks that drains and settles reliably. That space accounts for the bedding sand layer (1 inch) and the paver thickness (typically 2 to 2. 5 inches for concrete pavers, more for thick natural stone).
Slope the top of the sub-base very slightly away from the house or toward one side at about 1/8 to 1/4 inch per foot. This slope carries water off the finished patio surface and keeps it from pooling. It's a small grade change that makes a big difference long-term.
Once the sub-base is fully compacted and graded, install your edge restraints around the perimeter of the patio area before you lay any sand or pavers. Plastic or metal edge restraints staked firmly into the base keep everything contained during and after installation.
Installing the patio surface and finishing details
Spread a 1 to 1.5 inch layer of coarse concrete sand (or chip stone screenings) evenly over the compacted base. Use two lengths of 1-inch conduit pipe as screed guides to pull the sand level and consistent in depth. Don't compact this sand layer. It stays loose so the pavers can be pressed into it and adjusted. Basalite's paver installation guidance specifies this bedding course at a uniform 1-inch depth, and most ICPI-aligned references stay in that 1 to 1.5 inch range. Going thicker than 1.5 inches gives you an unstable base that allows pavers to rock and settle.
Lay pavers from a corner, working outward. Keep consistent joint spacing using the natural gap between pavers (usually 1/8 inch for concrete pavers). Check for level frequently and use a rubber mallet to tap down any high spots. When you reach the edges or need to fit pavers around obstacles, use a circular saw with a diamond blade or a rented block splitter for clean cuts.
Once all pavers are laid, run the plate compactor over the entire surface to press the pavers firmly into the sand bed. Then spread polymeric jointing sand over the surface, sweep it into the joints, and run the compactor over it again. Mist the surface lightly to activate the polymeric binder, and let it cure per the product instructions before walking on it.
Clean up the wall face and patio edges, reset any edge restraint spikes that got bumped, and do a final check of your drain outlet to make sure it's clear and flowing to daylight. That's your finished raised patio.
Common problems and how to fix them
Even well-built raised patios can run into issues, especially in the first year or two as things settle. Here's what to watch for and what to do about it.
Settlement and uneven pavers
If individual pavers start sinking or you notice an area going unlevel, the cause is almost always inadequate base compaction underneath. Pull up the affected pavers, remove the bedding sand, add more compacted base material if needed, re-screed the sand layer, and relay the pavers. This is fixable, and because the pavers aren't mortared in, it's actually one of the easiest repairs in any outdoor surface.
Wall bowing or leaning
A wall that starts to bow outward partway up is nearly always a drainage or compaction failure. Water has saturated the backfill and is pushing the wall from behind, or the backfill wasn't compacted properly and is shifting. Catching this early matters. If the movement is minor (under half an inch over 10 feet), monitor it through a wet season and consider adding a drain pipe if one wasn't installed. If the bowing is more pronounced or accelerating, stop using that area and consult a retaining wall installer or structural engineer, because rebuilding the section is likely the only real fix.
Water pooling on the patio surface
If water sits on the patio after rain, your surface slope is off. You can sometimes correct mild pooling by pulling up pavers in the low area, adding a little more compacted base to raise the elevation, and relaying. For larger areas, it may require re-grading the whole sub-base. This is why checking your slope at the sub-base stage (before the sand and pavers go down) is so much easier than fixing it afterward.
Frost heave
In cold climates, frost heave is a real concern. Water in the sub-base freezes, expands, and lifts pavers or pushes wall blocks out of alignment. The best prevention is good drainage throughout the entire system (water that isn't there can't freeze) and a base depth that gets below the local frost depth. In many northern US regions that means 12 to 18 inches of compacted aggregate base under the paver surface. Check your local frost depth and match your base depth to it.
Sand washing out of joints
If joint sand disappears quickly after rain, either the joints were underfilled to start with, or water is running across the surface too fast. Top up joints with fresh polymeric sand and make sure your surface slope is directing water off the edge, not across a wide area of the patio.
Permits, safety, and when you need an engineer
Most residential jurisdictions require a building permit for retaining walls over a certain height. The International Building Code sets a general threshold of 4 feet total height (measured from the bottom of the footing to the top of the wall) as the point where a permit is required. Some localities set that lower: Montgomery County, MD requires a permit for walls with retained height over 3 feet, and Oakland, CA uses 4 feet from bottom of footing. Check with your local building department before you dig, not after. The permit process is usually straightforward for simple walls, and an inspector can actually help catch problems early.
There are situations where a DIY build crosses into engineering territory and you genuinely need a licensed engineer to review or stamp a plan. These include walls over 4 feet of retained height, walls that support a surcharge load (like a driveway, deck, or the weight of a structure near the top), tiered wall systems where one wall sits close behind another, any wall near a property line, and sites with known poor or unstable soils. A structural engineer doesn't mean the project is out of your hands, it just means you get a reviewed plan to build from.
| Situation | Typical Requirement |
|---|---|
| Wall under 3 ft retained height, no surcharge | Permit usually not required, but check locally |
| Wall 3 to 4 ft retained height | Permit often required; simple plan review typical |
| Wall over 4 ft retained height | Permit required; engineer-stamped plan often needed |
| Wall supporting surcharge (deck, driveway, structure) | Engineer review required regardless of height |
| Tiered walls (two or more walls close together) | Engineer review strongly recommended |
| Wall near property line or in problem soils | Permit and possibly engineer required |
On the safety side, never work in a trench deeper than 4 feet without proper shoring or sloping the trench walls. Retaining wall blocks are heavy (some weigh 80 to 100 pounds each) so use proper lifting technique, get a helper for heavier pieces, and wear steel-toed boots. And before you dig anywhere, call 811 (in the US) to have underground utilities located. It's free, it's required by law in most states, and it prevents the kind of mistake that ruins a project before it starts.
Maintenance after the build
A well-built raised patio doesn't need much upkeep, but a few annual checks will keep it performing for decades. Every spring, walk the perimeter and look at the wall face for any signs of forward lean or bowing. Catch movement early. Clear the drain outlet at the end of the wall so water can exit freely through the season. Check joint sand levels in the patio surface and top them up with polymeric sand if gaps are opening. After the first winter, re-examine the base of the wall for any soil erosion around the footing area and fill it in with compacted gravel or topsoil as appropriate. These are 15-minute checks that save you from much bigger fixes later.
How this project fits with other block patio builds
If your yard is relatively flat and you don't need the retaining wall component, building a standard block patio follows most of the same principles (compacted base, sand bedding, edge restraints, polymeric sand joints) but without the wall construction steps. The raised retaining wall version is essentially a flat patio build sitting on top of a contained, filled platform, so the skills and materials overlap heavily. You can also extend this project to include block steps connecting the raised patio to the lower yard, which uses the same stacking and base preparation logic as the wall itself. If you’re adding patio block steps, make sure the tread base is compacted and the risers are supported so the steps stay level as the patio settles.
FAQ
Can I build a raised patio on a slope using the same pavers as the patio surface, without a real retaining wall design?
Yes, but the key is matching the wall system to the block’s design. Don’t treat a raised patio like ordinary paver edging, use only SRW retaining wall blocks with the correct setback (batter) and interlock features, and build the drainage and geotextile exactly behind the wall. If the grade drop is more than your typical DIY wall height, plan to step the design into multiple wall segments rather than trying to force one taller wall.
What if my patio base fill ends up right against the back side of the wall, can I just pack it tight?
If the patio surface needs to be very close to the wall, you must ensure the drainage zone and folding of geotextile aren’t getting blocked. Keep the drainage aggregate behind the wall units continuous up to the wrapped geotextile, and don’t backfill with soil or topsoil. Also avoid burying the cap blocks with patio base material, because the cap is part of the top restraint and water management system.
How do I avoid creating a low spot that will pool water after the pavers are installed?
Use the 1/8 to 1/4 inch per foot slope rule for the finished patio surface, but also confirm the slope while you are grading the compacted sub-base. If you only correct slope after pavers go down, you will usually end up with uneven joints and rocking. A practical approach is to check elevations at multiple points with a straightedge before sand goes on.
Can I adjust the patio slope by changing the thickness of the sand bedding instead of regrading the sub-base?
Yes, but only if you maintain a consistent bedding layer thickness. Most paver surfaces tolerate small flatness changes better than thickness changes, so if you need a slope toward one side, keep the sand bedding layer uniform (about 1 inch to 1.5 inches) and let the sub-base carry the grade. Using a thicker sand bed in one area often leads to settlement and joint gaps later.
How wet should drainage aggregate and compactable base be when compacting?
For most residential retaining wall patios, wetting and compacting every lift matters more than the exact number on a moisture meter. If your base or backfill is too dry, compaction won’t lock it in, and if it’s too wet, you can cause rutting and weakened fill. The practical test is that the material should hold shape when squeezed by hand, not crumble into dust or ooze water.
Is it okay to take a break mid-project, or do I need to build the wall continuously?
You can, but it will complicate alignment and usually costs time. If you must stop during wall building, keep the backfill and drainage aggregate from being mixed with topsoil, cover exposed geotextile so fines don’t get into it, and do not leave the wall with an incomplete drainage outlet path. When you resume, verify that the footing/base is still level and that you can continue in running bond without rebuilding the alignment.
How do I troubleshoot pavers that keep sinking in the same area after a repair?
Some paver settlement is fixable early, but recurring sinking points are a warning sign. First confirm whether it is one localized area (fix by re-excavating and re-compacting base there) or a pattern that suggests a broader compaction issue. If multiple pavers sink along a line, suspect base contamination (topsoil mixed in) or insufficient lift compaction depth.
In cold climates, what’s the most common mistake that leads to frost heave on raised patios?
In freeze-thaw regions, don’t rely on extra joint sand or polymeric sand to “protect” the build. The real prevention is keeping water from being retained in the system by maintaining the drainage aggregate zone, ensuring the drain pipe outlet is clear, and building enough base thickness below the paver surface to get below local frost depth. If your wall is near the frost line, a properly drained system prevents both wall movement and patio heave.
Can I water and compact the pavers right after spreading polymeric sand?
Don’t compact polymeric joint sand, and don’t overapply water during activation. If you add too much water or compact too soon, the joints can wash out or harden incorrectly, which leads to joint loss and weeds. Use light misting only, then let it cure fully per label instructions before heavy traffic or soaking.
What happens if I accidentally used decorative blocks instead of true retaining wall blocks?
If you used a wall block that was not specifically engineered for retaining walls, the setback and locking method may not provide the stability you need. Decorative blocks can look similar, but without the correct geometry and intended drainage behavior, the wall can tip or bow under hydrostatic pressure. When in doubt, verify the product is an SRW retaining wall system with documented installation parameters.
Can I add raised patio block steps later, after the wall is built?
Yes, and it should be planned, not improvised. Use the same reinforcement logic as the wall, keep the steps’ tread bases properly compacted and supported, and tie the drainage so water can still exit without being trapped behind the step zone. A common failure is under-compacted step base that shifts relative to the patio and creates a visible seam or lip.
How do I verify the drain outlet is actually working once construction is finished?
Treat drainage outlets like critical infrastructure. If the outlet is blocked by landscape fabric, soil berms, or downspout runoff that overwhelms the drain, water will back up and pressure the wall. Ensure the outlet runs to a daylight location and stays clear through storms, and visually inspect it after the first heavy rain to confirm flow.
Can I cap the wall with leftover blocks or a generic cap, or does it need to match the system?
Most raised patio blocks are designed to be a system, so swapping cap blocks for a “cheaper” generic option can reduce top restraint and water protection. Use the manufacturer’s cap or compatible top units, and if you need to cut or customize, keep the hollow-core protection and alignment intent. The goal is a locked, sealed top that prevents water intrusion into block cores.
Do I always need a permit for a retaining wall under the height limit, especially if it supports patio grade?
For very small walls, a typical “do I need a permit” answer depends on local height rules, but also on whether it is retaining natural grade. Even if your wall is under the stated height threshold, setbacks, proximity to property lines, and surcharge loads (like decks or driveways) can still trigger review. If you are near a boundary or plan to add structures near the top, call the building department before digging.