
You can absolutely lay a small patio yourself over a weekend or two. If you want a step‑by‑step walkthrough and tips for common pitfalls, see our detailed guide on how to lay a patio yourself. For a simple step-by-step walkthrough, see how to lay a patio easy. The process comes down to four things done in the right order: plan the space and fall direction, dig out and compact a solid base, bed your paving on sand or mortar, and finish the joints and edges. Get those four stages right and the result will be level, drain properly, and last for decades. Skip or rush any of them and you will be relaying slabs within a couple of years.
How to Lay a Small Patio: Complete DIY Guide & Checklist

Clara Farrell
16 Jul 2026
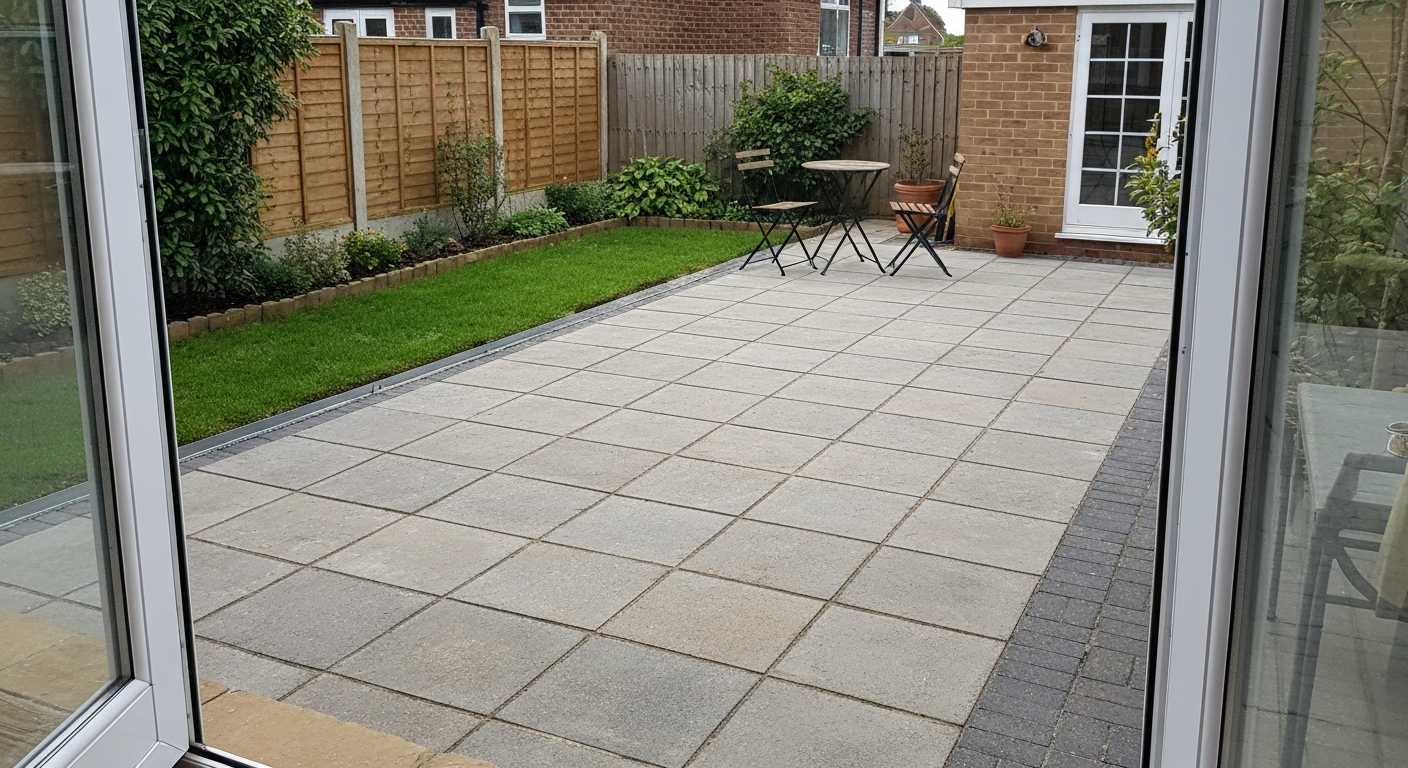
What 'small patio' actually means and what it can look like
For this guide, a small patio is roughly 10–25 square metres, which covers the most popular sizes: a 2.4 m x 4 m bistro area outside a back door, a 3 m x 4 m seating zone, or a 5 m x 5 m entertaining space. These are manageable for one or two people working without large plant hire, and the material quantities stay affordable. Anything under about 6–8 m² is really a stepping-stone path or a door threshold rather than a proper patio, but the same methods apply.
In terms of finished look, you have more options than most people realise. Concrete paving slabs are the most forgiving for a first project. Natural stone flags (sandstone, limestone, slate) look stunning but need accurate mortar bedding. Brick and concrete block paving give a classic look and are actually very DIY-friendly once the base is right. Porcelain tiles are increasingly popular but are harder to cut, need full mortar bedding, and should go over an existing concrete base or a freshly poured slab rather than on sand. This guide focuses on the method that suits the widest range of first-time DIYers: a compacted hardcore sub-base with a sharp sand bedding layer, suitable for concrete slabs, natural stone, brick, and concrete block.
Quick decision guide: which method suits your site and skill level
Before you buy a single bag of sand, spend five minutes matching your situation to the right installation method. The wrong method for your ground conditions is the most common reason patios fail. The table below summarises the main options.
| Method | Best for | Skill level | Typical base | Main risk |
|---|---|---|---|---|
| Compacted hardcore + sharp sand bed | Concrete slabs, natural stone, brick, block paving on good to average soil | Beginner to intermediate | 100–150 mm MOT Type 1 + 25 mm bedding sand | Uneven bedding causing rocking slabs |
| Full mortar bed (semi-dry mix) | Natural stone, large format slabs, porcelain over hardcore | Intermediate | 100–150 mm MOT Type 1 + 30–40 mm mortar bed | Mix too wet or dry, hollows under slab |
| Dry-lay / self-binding gravel edged blocks | Quick weekend project, rental properties, temporary areas | Beginner | 100 mm compacted MOT Type 1 only | Edge creep without firm restraint |
| Over existing concrete or tarmac | Updating a tired surface without full dig-out | Intermediate | Existing slab (must be sound) + adhesive/full mortar | Bonding failure if base is cracked or damp |
| Permeable interlocking block paving | Gardens with drainage problems, clay soil areas, SuDS requirement | Intermediate | Open-graded aggregate base 150–250 mm | Choking with fine material if geotextile omitted |
If your garden has clay soil, plan for a deeper sub-base (150–250 mm of compacted Type 1 aggregate rather than the minimum 100 mm) and consider a geotextile separator between the soil and the hardcore. Clay does not drain freely, it moves seasonally, and a thin base on clay is a recipe for a cracked, uneven patio within a few winters. Working on sloped ground just means setting your fall direction deliberately as part of the layout stage, which is covered below.
Planning and layout: getting the measurements and fall right
Measure your intended patio area carefully and sketch it on paper with dimensions. Note where the house wall, fence, or boundary is, and mark any obstacles: drain covers, soil pipes, steps, or raised beds. The most important planning decision at this stage is where the water will go. Your finished patio surface must slope away from the house at a minimum of 1:100 (that is 1 cm drop for every 1 m of length). A 2% fall (1:50, or 2 cm per metre) is better for a larger area and is the standard most builders aim for. Water must drain off the edge into a border, a channel drain, or a gully: never pond against the house wall or flood a neighbour's property.
To mark out the area on the ground, use timber pegs and builder's line (stringline). For a rectangular patio, measure out one corner at 90 degrees using the 3-4-5 method: measure 3 units along one line and 4 units along the adjacent line, then adjust until the diagonal between those two points measures exactly 5 units. Scale it up for accuracy (for example, 900 mm, 1200 mm and 1500 mm). Mark the perimeter with spray paint or sand once you are happy it is square. Set up profile boards just outside the corners to preserve the reference lines throughout the dig.
Also decide your slab pattern and joint width at this stage. Running bond (brickwork pattern), herringbone, and random multi-format patterns all work well for small patios. A consistent joint width of 10–15 mm for slabs or 3–5 mm for block paving makes pointing easier and the result neater. Dry-laying a row of slabs with spacers before you commit to the final layout will show you where cuts will fall and whether you can shift the pattern slightly to avoid thin slivers at the edges.
Tools and materials checklist
The exact list depends on your chosen method, but below are the tools you will need for the recommended hardcore plus sharp sand method, followed by additions for a full mortar bed approach.
Tools for the hardcore and sand method
- Spade and mattock (or mini-digger hire for larger areas)
- Wheelbarrow (at least one, ideally two)
- Plate compactor (hire from most tool hire shops — budget around £40–60 per day in the UK)
- Long spirit level (at least 1.2 m) and a shorter 600 mm level
- Straight edge or long aluminium screed rail (2–3 m)
- Timber pegs and builder's line (stringline)
- Tape measure, set square, spray paint or sand for marking
- Rubber mallet for bedding slabs
- Pointing bar or margin trowel for adjusting slab positions
- Brick bolster and club hammer (for cutting slabs without a saw)
- Angle grinder with diamond blade or disc cutter for accurate cuts
- Safety glasses, gloves, steel-toe boots, dust mask (especially when cutting)
- Knee pads (your knees will thank you)
- Brush for sweeping in jointing sand
- Hosepipe or watering can for settling sand and activating polymeric joint sand
Additional tools for a mortar bed method
- Cement mixer or large mixing trough and mixing paddle
- Gauging trowel and flat trowel
- Sponge and bucket for cleaning slabs before mortar sets
- Pointing gun or grout bag for joint mortar (optional but useful)
Materials
- MOT Type 1 crushed limestone or granite sub-base aggregate
- Sharp sand (coarse grit sand, NOT building sand) for the bedding layer
- Paving slabs, concrete blocks, or natural stone flags of your choice
- Edge restraints: plastic or metal paving edging with anchor spikes, or pre-made concrete edging kerbs
- Jointing material: kiln-dried sand, polymeric joint sand, or mortar mix (depending on paving type)
- Geotextile membrane (strongly recommended on clay soils)
- Ready-mix mortar or separate cement and sharp sand if using mortar bed method
Calculating quantities: the maths made simple
Start with your area in square metres (length x width). Add 5–10% to slab and block quantities to allow for cuts and breakages: 5% for a simple square or rectangle, 10% for complex shapes or diagonal patterns. For sub-base and sand, you need to think in cubic metres (area x depth in metres). One tonne of MOT Type 1 covers roughly 5–6 m² at a 100 mm compacted depth, or about 4 m² at 150 mm depth.
Here is a worked example for a 3 m x 4 m patio (12 m²) on average soil with a 100 mm sub-base and 25 mm sand bed.
| Material | Calculation | Quantity to order |
|---|---|---|
| Paving slabs | 12 m² + 5% waste | ~12.6 m² (round to 13 m²) |
| MOT Type 1 sub-base | 12 m² x 0.10 m depth = 1.2 m³; at ~2 tonnes per m³ uncompacted | ~2.4 tonnes (order 2.5 t) |
| Sharp sand (bedding) | 12 m² x 0.025 m = 0.30 m³; at ~1.6 tonnes per m³ | ~0.5 tonnes (order 3 x 25 kg bags per m² ≈ 2–3 bulk bags) |
| Edge restraint | Perimeter of patio: (3+4) x 2 = 14 m | 15 m of edging (add 1 m for overlaps/cuts) |
| Kiln-dried jointing sand | Approx. 1 x 20 kg bag per 4–5 m² | 3 bags for 12 m² |
For clay soil, increase the MOT Type 1 quantity to allow for a 150 mm compacted depth: multiply your area by 0.15 instead of 0.10. On a 12 m² patio that means approximately 3.6 tonnes of sub-base aggregate rather than 2.4 tonnes. It is always better to over-order by a small margin and return surplus bulk bags than to run short mid-project.
Quick quantity cheat-sheet for common small patio sizes
| Patio size | Area (m²) | MOT Type 1 at 100 mm (tonnes) | MOT Type 1 at 150 mm (tonnes) | Sharp sand at 25 mm (bulk bags) | Slabs inc. 5% waste (m²) |
|---|---|---|---|---|---|
| 2 m x 3 m | 6 m² | 1.2 t | 1.8 t | 1 | 6.3 m² |
| 3 m x 4 m | 12 m² | 2.4 t | 3.6 t | 2 | 12.6 m² |
| 4 m x 4 m | 16 m² | 3.2 t | 4.8 t | 2–3 | 16.8 m² |
| 4 m x 5 m | 20 m² | 4.0 t | 6.0 t | 3 | 21.0 m² |
| 5 m x 5 m | 25 m² | 5.0 t | 7.5 t | 4 | 26.3 m² |
Safety, permissions and checks before you start
In the UK, most domestic patios do not require planning permission provided they drain into the garden (permeable surface) or into a soakaway rather than onto the road or into a main drain. However, if you are laying more than 5 m² of impermeable surface in the front garden, you will need planning permission or to use a permeable paving system. For back gardens there is generally no such restriction, but always check with your local planning authority if you are near a listed building, in a conservation area, or on a newbuild estate with specific covenants.
The most important pre-start check is underground services. Before you dig anything, call or use an online service to check for buried cables and pipes. In the UK, use Dial Before You Dig or your local utility mapping service. Cable locators can be hired cheaply. A spade through a buried electric cable is genuinely life-threatening and will cost far more to repair than any patio.
Pre-start safety checklist
- Mark or locate all underground services (gas, electric, water, telecoms, drainage)
- Locate and protect any drain inspection covers — these must remain accessible after paving
- Wear steel-toe boots throughout the project (heavy slabs and compactor plates)
- Wear safety glasses and a dust mask whenever cutting paving materials
- Wear gloves when handling cement products — wet cement is highly caustic
- Keep children and pets off the work site, especially during compaction
- Do not use an angle grinder without a disc guard and face protection
- Check weather forecast: avoid laying mortar beds in wet weather or when frost is forecast within 24 hours
- Organise skip or bags for spoil before you start — you will generate a lot of excavated material
Excavation and base preparation: getting the depth right
The total excavation depth is calculated by adding three layers together: sub-base depth, bedding layer, and paving thickness. For a typical DIY patio on average soil using 50 mm concrete slabs, with a 100 mm compacted sub-base and 25 mm sand bed, you need to excavate to a minimum depth of 175 mm below your intended finished surface level. On clay or soft ground, increase the sub-base to 150 mm, taking you to 225 mm total excavation depth. Natural stone flags vary: 22–38 mm for sawn decorative stone, up to 50–63 mm for heavier utility flags. BS EN 1338, Concrete Paving Blocks (standard text / referenced in BS 7533) sets product performance and laying requirements for precast concrete paving units, including common thickness classes (typically 50–63 mm for pedestrian flags and around 60 mm for block paving) used in UK specifications BS EN 1338 — Concrete Paving Blocks (standard text / referenced in BS 7533). Always check the thickness of the specific product you are buying and adjust your calculations accordingly.
Mark the finished surface level on your profile boards or a datum peg before you dig. This is the most useful reference point you will have throughout the job. Set it at a height that ensures the finished patio sits slightly below the damp-proof course of the house wall (at least 150 mm below the DPC in the UK) and just above the surrounding lawn or border level so water can drain away naturally.
Excavating and preparing the sub-grade
- Remove all turf, topsoil and organic material from the marked area. Topsoil compresses and rots — any left in will cause sinking.
- Excavate to your calculated depth, keeping the base as level as possible. Work to your profile boards.
- Remove any large stones or roots that could cause future movement.
- If you find very soft or waterlogged spots, dig deeper into those areas and fill with additional Type 1 aggregate. Do not bridge over soft ground.
- On clay soil: lay a geotextile membrane (non-woven, minimum 200 gsm) across the entire excavated area before adding sub-base material. This stops clay migrating up into the aggregate over time.
- Compact the exposed subgrade with the plate compactor before adding any sub-base. One or two passes is usually enough at this stage.
Building the sub-base
Tip in your MOT Type 1 aggregate and spread it evenly. If your total sub-base depth is over 100 mm, compact it in two layers (lifts) rather than all at once: compact the first 100 mm, then add the remaining material and compact again. Compacting in lifts is the single most important thing you can do to get a stable base. The plate compactor needs to be heavy enough to do the job properly, with a plate area of at least 0.25 m² and working pressure of around 75 kN/m² at 75–100 Hz. Most hire plate compactors in this class weigh 80–100 kg and are perfectly adequate for residential patios.
Make multiple passes across the sub-base in overlapping runs, then do another set of passes at 90 degrees. The material should lock together and stop shifting under the compactor. Once compacted, the surface should not move when you walk on it. Check it is at the right depth by measuring down from your stringline at multiple points. Adjust with a little extra Type 1 or scrape back excess as needed, then compact again lightly.
Dealing with difficult ground
On very poor ground (soft clay, peaty or filled ground, or areas that stay waterlogged), a standard DIY sub-base may not be enough. Options include: doubling the sub-base depth to 200–250 mm using two compacted lifts of Type 1; installing a perforated land drain at the base of the excavation to redirect water; or, in the worst cases, seeking advice from a groundworker before proceeding. Patios on filled ground (old gardens where material has been tipped over the years) are unpredictable and are one situation where I would honestly recommend getting a professional assessment before you invest in materials.
Step-by-step: laying the patio on compacted hardcore and sharp sand
This is the method I recommend for most first-time DIY patios using concrete slabs, natural stone, or brick and block paving. For a detailed, step-by-step walkthrough tailored to UK regulations and materials, see our guide on how to lay a patio UK. It is forgiving, does not require mortar mixing, and allows you to lift and re-lay individual slabs later if needed. Work through the steps in order and do not rush any stage. For a visual walkthrough, watch the YouTube video 'how to lay a patio' for a clear step‑by‑step demo.
Step 1: Install the edge restraints
Fix your perimeter edge restraints before laying any sand or paving. Plastic or metal paving edging is driven into the compacted sub-base with anchor spikes at roughly 500 mm intervals. The edging must sit at the correct finished height, use your stringlines to set this accurately. For a stronger restraint, particularly on corners and where the patio meets a lawn, you can haunch a strip of concrete (about 100 mm wide x 100 mm deep) behind the edging. The key rule here from industry guidance is that your compacted base should extend at least 250 mm past the edge restraint stakes so the spikes have something solid to grip. This is what stops the edges creeping outward over time.
Step 2: Screed the bedding sand
Tip sharp sand (coarse grit sand, never building sand or soft sand) onto the compacted sub-base and spread it roughly with a rake to just above the required depth. You are aiming for a screeded layer of exactly 25 mm thick after compaction. To get a consistent depth, place two lengths of 25 mm steel box section or conduit parallel across the area as screed guides, set to the correct fall using a spirit level. Drag your straight-edge screed rail across the top of these guides to create a flat, accurate surface at the right level. Remove the guides and fill the channels with sand, smoothing lightly by hand. Do not walk on the screeded sand, work from boards or kneelers placed on the already-laid paving as you progress.
Step 3: Lay the paving
Start from the most visible corner (usually the corner closest to the house and most visible from the garden door or seating position). Place each slab or block gently onto the screeded sand, lower it down rather than sliding it, and bed it with firm taps from a rubber mallet. Check level in two directions with your spirit level after every two or three slabs. The gap between slabs should be consistent, use tile spacers, cut pieces of plywood, or proprietary paving spacers to maintain a uniform 10–15 mm joint for slabs. For block paving, lay blocks tightly with just a 3–5 mm gap.
Check your fall direction regularly with a long spirit level or a straight-edge with a wedge underneath (a 10 mm shim under a 1 m straight-edge gives you a 1% fall). If a slab sits too high, lift it, scrape back a little sand, and relay. If it sits too low, add a small amount of sand and relay. Never use fragments of stone or bits of tile to pack under slabs: these create point loads and crack slabs over time.
Step 4: Cut slabs to fit
Mark your cut line with chalk or a pencil. For straight cuts on concrete slabs, an angle grinder with a diamond blade is the most practical tool for a DIYer. Score the line first with a shallow pass, then gradually deepen with successive passes. For natural stone, the same approach works but take care not to over-cut. A brick bolster and club hammer can score and snap concrete slabs along straight lines, but the cut quality is lower. Always wear safety glasses, a dust mask (especially for cutting stone or concrete), and gloves. Cutting produces a lot of fine silica dust, which is a real health hazard: wet-cutting with a hose trickle over the blade greatly reduces airborne dust.
Step 5: Compact the finished surface
Once all the paving is laid and you are happy with the levels, run the plate compactor over the entire area. This consolidates the sand beneath each slab and ensures everything is locked in. For concrete slabs and block paving, this is a standard step. For natural stone, embossed, or textured pavers (and especially for porcelain), always fit a rubber or urethane pad to the base of the plate compactor to avoid scuffing or cracking the surface. Do a minimum of two passes, working in different directions.
Step 6: Fill the joints
Sweep dry jointing material into the gaps. You have three practical options. Kiln-dried sand is the easiest: pour it over the surface, sweep it into the joints, then run the plate compactor over once more to vibrate it down, sweep again, and repeat until the joints are full. Polymeric joint sand works the same way but contains a binder that hardens when dampened: follow the manufacturer's instructions carefully, as the activation step (a light misting with water) must happen after sweeping is complete and the joints are full, and you must avoid rain for the specified cure period (usually 24 hours). For natural stone setts or a more traditional look, mortar pointing gives a durable finish: use a fairly stiff mix and tool the joints to a slightly recessed profile so rain does not sit on the joint surface.
Step 7: Check drainage, clean up, and finish
Test the drainage by pouring a bucket of water onto the finished patio and watching where it goes. The US EPA, National Menu of Best Management Practices (Permeable Pavements) includes homeowner and design fact sheets explaining when permeable pavements are appropriate, the difference between infiltration and non‑infiltration designs, and basic maintenance needs US EPA — National Menu of Best Management Practices (Permeable Pavements). It should sheet off steadily toward the low edge within a few seconds. If it ponds anywhere, that area needs to come up, the sand needs to be re-screeded, and the slabs need to be relay. Catching this now is far easier than in two years when the slabs have bedded in and vegetation has grown around the edges.
Once drainage is confirmed, brush off any sand residue and wash down the surface with clean water. Allow mortar or polymeric sand to cure fully before placing furniture. For natural stone, apply a sealer according to the manufacturer's guidance (most sandstone benefits from a penetrating impregnator sealer to reduce staining). For the edge between the paving and any borders, backfill and firm down the soil, then plant low groundcover or lay a strip of lawn edging to stop soil washing onto the patio.
Common mistakes and how to avoid them
I have made most of these mistakes at least once, so consider this fair warning rather than judgement.
- Not setting a datum peg before digging: without a fixed finished-level reference, depths drift and slabs end up at the wrong height relative to the house door threshold or lawn. Set the datum first, everything else comes off it.
- Using building sand instead of sharp sand for the bed: building sand is too fine, holds moisture, and compresses unevenly under slabs, causing sinking and rocking. Always use coarse sharp sand or grit sand.
- Leaving topsoil under the sub-base: organic material compresses over years. If you can see dark topsoil in the base of your excavation, keep digging.
- Skipping compaction or under-compacting: the most common reason patios sink. If you cannot hire a plate compactor, at minimum compact with a heavy timber tamper, but hire the compactor if you can.
- Getting the fall wrong or laying it flat: a completely level patio will hold puddles after rain. Always build in at least a 1% fall away from the house.
- Laying paving in freezing temperatures or on frozen ground: mortar will not cure and the ground will heave when it thaws. Check the forecast and do not lay on frost days.
- Cutting slabs without dust control: silica dust from cutting concrete and stone is a serious respiratory hazard. Wet-cut where possible and always wear a dust mask rated at least FFP2.
- Forgetting to check joint width consistency: thin slivers of jointing material or wildly varying gaps look poor and weaken the joint structure. Use spacers throughout.
Time and cost expectations
A 12 m² patio using mid-range concrete slabs is a realistic two-weekend project for a capable DIYer working with a helper. The first weekend covers marking out, excavation, and sub-base compaction. The second covers screeding, laying, cutting, jointing, and finishing. Material costs in the UK in 2026 for a 12 m² patio using mid-range concrete slabs, MOT Type 1 aggregate, sharp sand, edge restraints, and kiln-dried jointing sand typically run to £400–£700 before tool hire. Natural stone adds £200–£400 to that. Tool hire (plate compactor, disc cutter) for the weekend runs to approximately £80–£120. A professional installation of the same area by a landscaper would typically cost £1,200–£2,000 or more, so the DIY saving is meaningful.
Maintenance and keeping it looking good
Once laid, a well-built patio needs very little attention. Sweep it regularly to stop grit grinding the surface. Re-fill any joints that wash out after heavy rain, which is normal in the first season. If you used polymeric sand and sections loosen, re-sweep with fresh polymeric sand and re-activate. Pressure wash once or twice a year (use a medium setting, not maximum pressure) to keep it clean. For natural stone, re-apply sealant every two to three years. If individual slabs rock or sink, lift them, add or scrape sand, and re-lay: a sand-bed installation is designed to be maintained this way without full reconstruction.
If you found this guide useful and want to go deeper on any specific part of the project, the related articles on how to lay patio paving, how to lay a patio yourself, and how to lay a patio the easy way cover variations in technique, materials, and shortcuts in more detail. There is also a full UK-specific guide covering building regulations and planning considerations in more depth, and a step-by-step DIY patio guide aimed at complete beginners who want a more detailed walkthrough of every stage.
FAQ
What are the first steps to plan a small patio project?
Measure the area and sketch to scale; mark fixed features (doors, drains, trees) and desired uses (seating, BBQ). Decide a finished level and minimum fall (aim 1–2% away from the house). Choose approximate materials and a laying pattern so you can calculate quantities and a realistic budget. Check underground services and local drainage/SuDS requirements if adding permeable paving or changing run‑off.
How do I choose the right paving material for a small patio?
Match material to use, appearance and skill level: concrete or porcelain pavers = consistent sizing/easier DIY; natural stone = higher cost and heavier cutting; brick/block = traditional look and interlock well; tiles/slate = need correct thickness and bedding. For pedestrian patios choose 50–65 mm paver thickness (or stone slabs per manufacturer). Consider slip resistance, frost resistance and whether permeable paving is required for drainage.
What are the common installation methods and how do I choose between them?
Main methods: (1) Compacted sub‑base + screeded bedding sand (sand‑set interlocking pavers) — good for DIY, permeable options, and most pedestrian patios. (2) Full mortar bed (wet bed) — better for natural stone flags and uneven slab thicknesses, more skilled work. (3) Adhesive/mortar onto existing solid base — used over sound concrete/asphalt. Choose sand‑set for ease and permeable systems; pick mortar bed if slabs are thin/irregular or manufacturer specifies. Consider site slope, soil type and loading when selecting method.
What tools and materials do I need for a typical small patio (2x3 m)?
Tools: tape, spirit level, string lines, mason’s line pins, shovel, rake, wheelbarrow, straightedge/2m screed board, brick trowel, plate compactor, rubber mallet, paving saw/angle grinder with diamond blade or snapper, jointer, broom. Materials (example quantities for 2x3 m): paving (6 m² + 5–10% wastage), compacted subbase aggregate 100–150 mm ≈ 0.2–0.3 m³, bedding sand 25 mm ≈ 0.015 m³, jointing sand/polymeric as required, edge restraint (plastic/metal strips or concrete haunch). Adjust quantities for slab thickness, soil type and chosen method.
How do I calculate excavation depth and material quantities?
Total excavation depth = paver thickness + bedding layer + compacted subbase + any subgrade allowance. Example pedestrian build: 50 mm paver + 25 mm bedding + 100 mm compacted subbase = 175 mm excavation. Material volumes: subbase volume = area × depth (m³). Add 5–10% for waste on pavers and 10–15% for subbase compaction/overspill. For jointing sand calculate joint width × joint depth × total linear joint length or use manufacturer coverage guidance.
What is the correct subbase and compaction procedure?
Excavate to required depth; remove organic topsoil; lay geotextile if required. Place angular aggregate in 50–75 mm lifts and compact each lift with a plate compactor until dense. Aim for a high relative density (industry targets are ≥95% Proctor for pedestrian patios). Ensure the compacted subbase is uniform and to the correct falls before screeding the bedding layer.