You can lay a patio yourself in a weekend or two by following a clear sequence: choose your material, plan the layout, excavate and compact a proper subbase, set your edging, bed the paving, cut to fit, and finish the joints. The YouTube videos make it look easy, and honestly it is manageable, but the ones that skip the prep work are the reason so many DIY patios sink, crack, or flood within a year. Get the ground prep right and the rest falls into place. If you want the whole project from start to finish, follow a step-by-step process for how to lay a small patio.
YouTube How to Lay a Patio: Step-by-Step DIY Guide

Clara Farrell
15 Jun 2026
Choosing the right patio material system
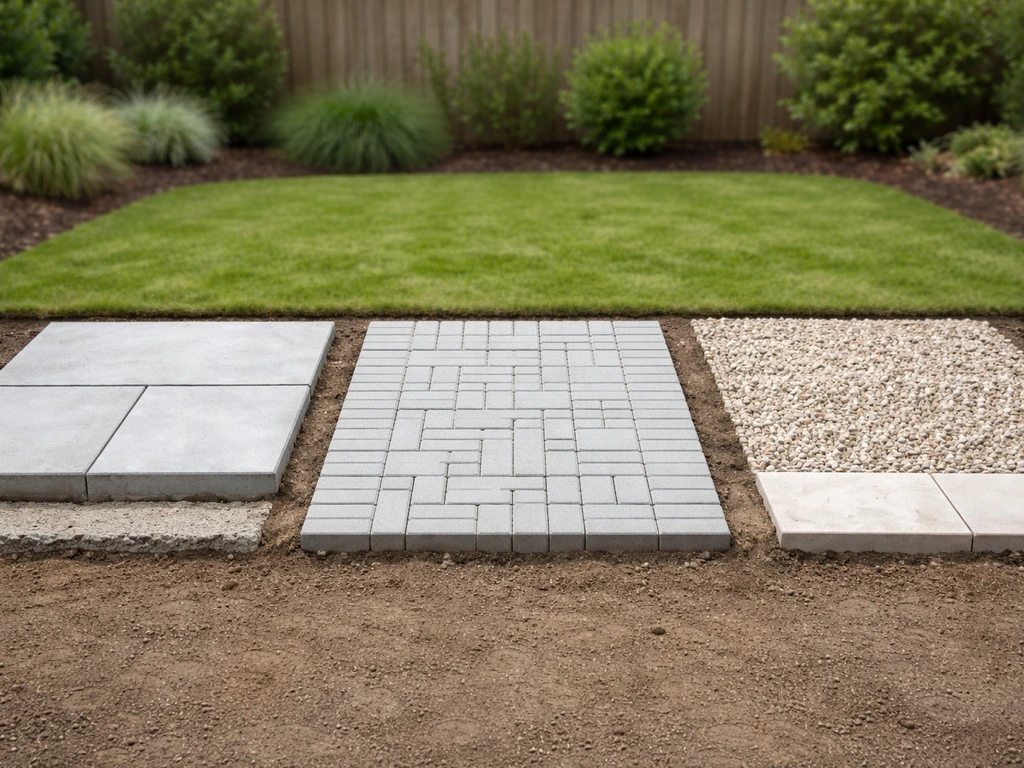
The material you choose affects everything downstream: how thick your base needs to be, what bedding method you use, and how you finish the joints. There is no single best option, but each system has a clear use case.
| Material | Install Method | Bedding Thickness | Best For | Watch Out For |
|---|---|---|---|---|
| Concrete block paving | Flexible (dry sand) | 70-80mm compacted sharp sand | Driveways, patios, curved designs | Edge restraints must be set first; joints need topping up after 4-6 weeks |
| Indian sandstone / natural stone flags | Bound (mortar bed) | 25-50mm mortar | Traditional patios, character gardens | Slab thickness varies; butter the back before laying |
| Concrete paving slabs | Bound (mortar bed) | 20-50mm mortar | Budget-friendly, low-maintenance | Heavier to manoeuvre; needs consistent bedding |
| Porcelain tile (20mm outdoor grade) | Mortar or adhesive bed | 25-50mm mortar or tile adhesive | Modern, sleek finish; frost resistant | Needs expansion joints every 2.4-3.6m; very unforgiving of uneven base |
| Slate / natural stone tile | Mortar bed | 25-50mm mortar | Premium finish, unique look | Slippery when wet unless textured; seal after laying |
For a first DIY patio, concrete paving slabs or Indian sandstone on a mortar bed are the most forgiving. Block paving is excellent but requires very precise edge restraint work before you start. Outdoor porcelain is stunning but demands a near-perfect, rigid base with built-in expansion joints, so it is better tackled once you have one project under your belt.
Planning layout, measurements, and design details
Before you dig a single spade of soil, spend time on paper. Measure the space accurately, mark it out with string lines and pegs, and work out your slab or block layout so you minimise cuts. Aim to keep cut pieces at the edges and make sure any cut piece is at least half a unit wide. Tiny slivers of tile or slab look poor and crack quickly.
The most important measurement is your finished surface height. If the patio runs up to the house, Building Regulations require the finished surface to sit at least 150mm below the damp proof course (DPC). This is not optional and it is the single most common thing DIYers overlook when they watch YouTube videos filmed in the US, where DPC rules differ. Mark the DPC position on the wall clearly with a pencil line before you excavate.
Next, plan your drainage fall. The patio must slope away from the house. A fall of 1:80 is the minimum required, but 1:60 is a more practical target for a domestic patio because it gives you a visible, reliable run-off without looking noticeably tilted. In real terms, 1:60 means a drop of about 16mm for every metre of patio width. For a 3m wide patio, that is roughly 50mm of fall from house wall to outer edge. Mark this onto your string lines before excavation so your levels are built into the ground prep, not bodged in at the bedding stage.
- Mark the patio outline with pegs and string lines, checking for square using the 3-4-5 triangle method
- Note the DPC position on the house wall and work out your maximum finished surface height from there
- Calculate your fall: at 1:60, allow 16mm of drop per metre running away from the house
- Sketch a dry-run layout of your slabs or blocks to minimise cuts and plan patterns before ordering
- Add 10% to your material order to account for cuts and breakages
Site preparation: clearing, excavation, and subbase build-up
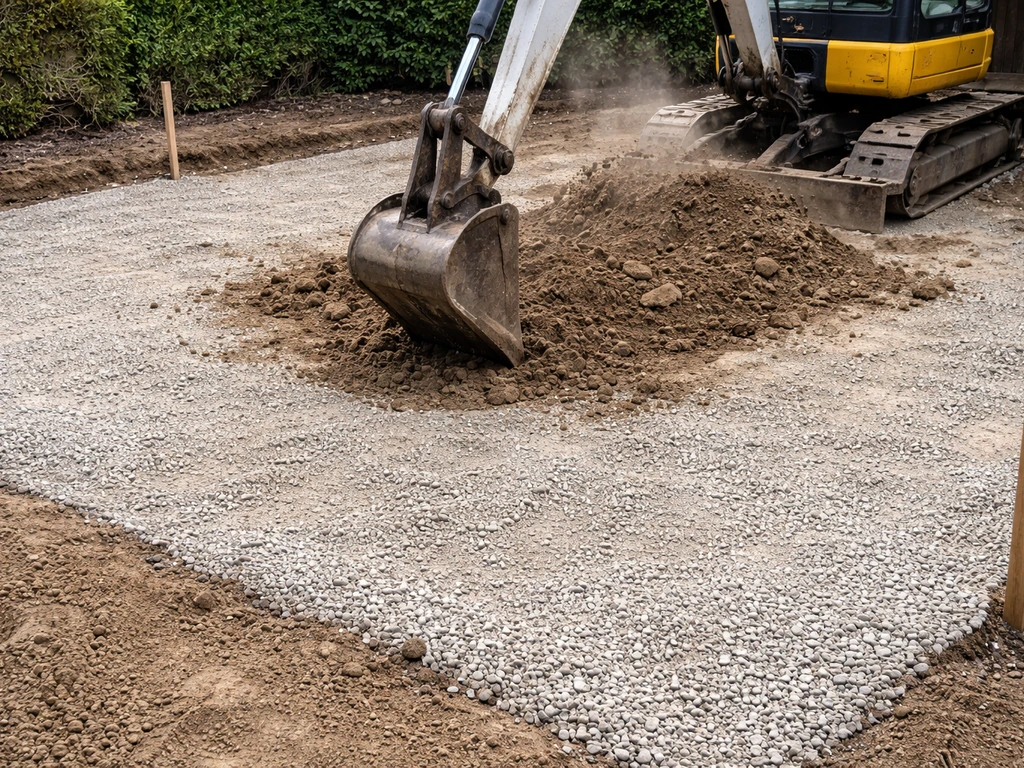
This is the part most YouTube videos rush through, and it is the part that determines whether your patio lasts two years or twenty. Clearing the site means removing all turf, plant roots, and soft topsoil. Topsoil is organic, it compresses and rots, and if any remains under your base it will cause the patio to sink.
Once cleared, you need to calculate your total excavation depth. Work backwards from your finished surface level. For a typical Indian sandstone patio, a practical build-up looks like this: 100mm of compacted MOT Type 1 subbase, plus 40mm of mortar bedding, plus the slab thickness (typically 20-25mm for sandstone). Add your 150mm DPC clearance from the house wall as your upper fixed point, and the required fall, and you will know exactly how deep to dig.
For most domestic patios, 100mm of compacted MOT Type 1 is the standard subbase depth. Driveways typically need 150mm, but for a foot-traffic patio, 100mm done properly is sufficient. If you have clay soil, be more generous, as clay holds water, moves with frost, and is more prone to heave. On clay, consider increasing to 150mm of Type 1 and check whether you need additional drainage measures.
When compacting the Type 1, never tip the full depth and compact it in one go. Compact in layers of no more than 150mm at a time (uncompacted depth). Hire a plate compactor for this. A few passes with a plate compactor is not enough: keep going until the surface stops moving under the machine. The finished paving is only as strong as what is underneath it, and loose subbase is the number one cause of patio failure.
Dealing with sloped ground and clay soil
If your garden slopes significantly, you have two choices: cut into the slope and create a level platform with a retained edge, or follow the slope and build a stepped patio. For a cut-and-level approach, the retained edge needs to be properly supported, either with a concrete haunching or a substantial edging course. On a steeply sloped site, this can get complicated quickly, and it may be worth getting a landscaper involved for the groundworks element even if you do the paving yourself.
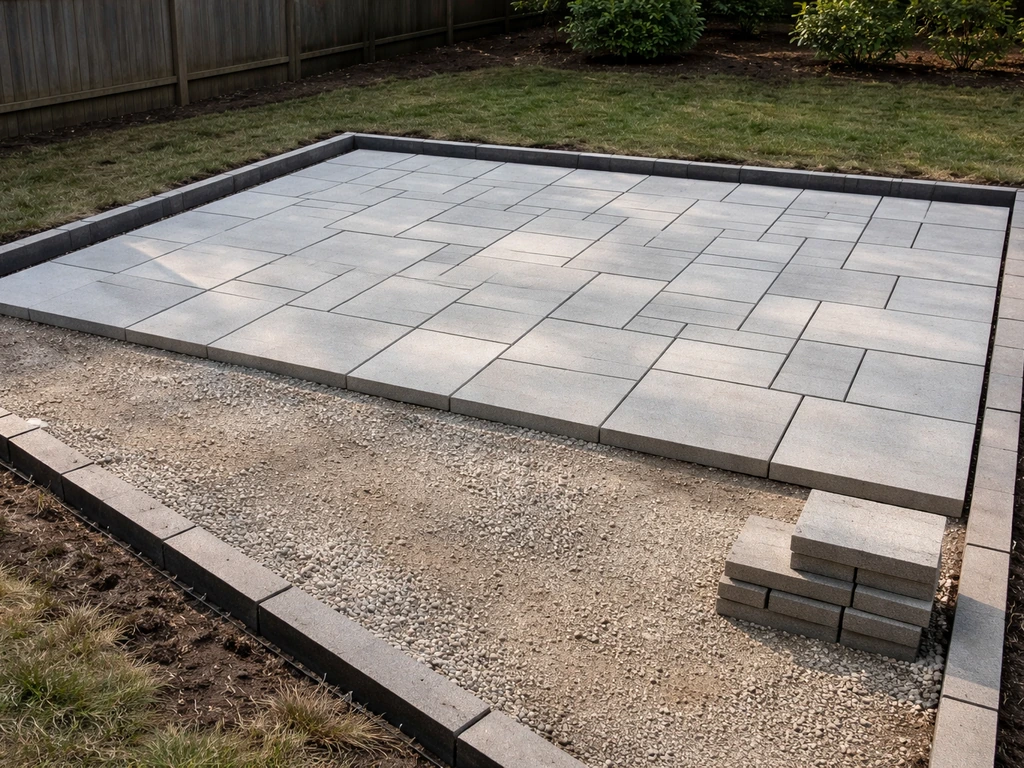
Base, edging, and drainage essentials
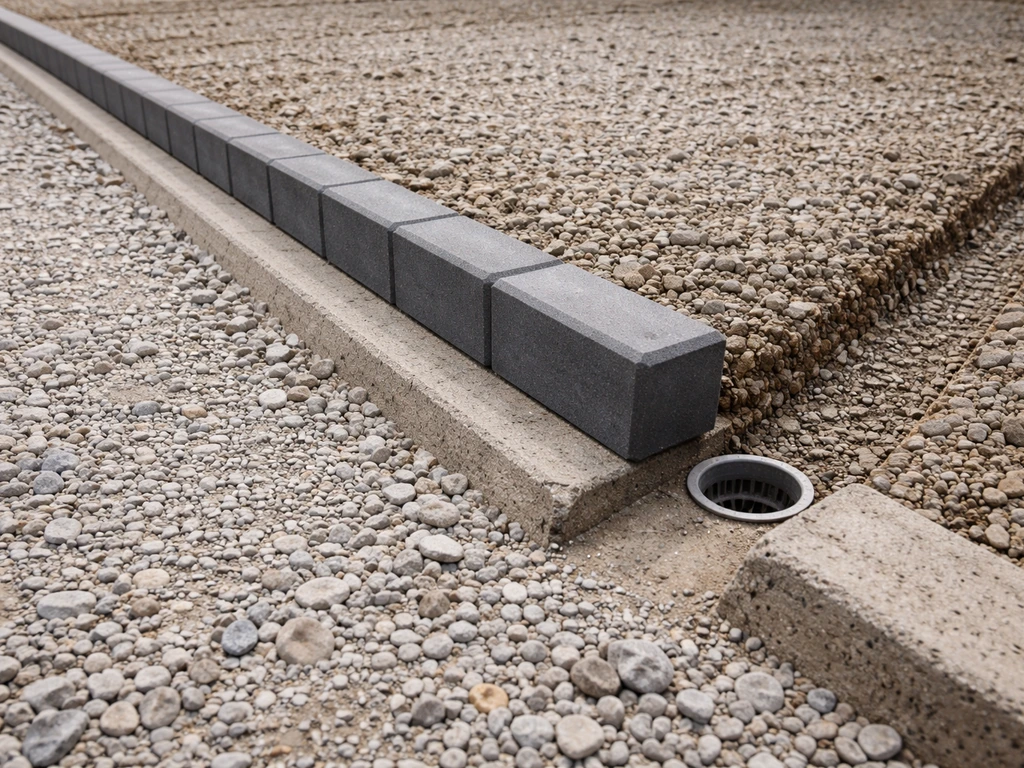
Once your subbase is compacted, you can set your edging. For block paving, the edging course must go in first, set on a concrete haunch (a strip of concrete along each edge), before any of the interior blocks are laid. The edging is what holds the whole flexible system together. Skip it or set it poorly and the edges will spread and collapse over time.
For mortar-bedded slabs, edge restraint is less critical structurally but still worth doing neatly. Set the perimeter slabs first using a full mortar bed, let them cure overnight, and use them as your reference for the interior. This is called working to a fixed edge and it keeps your lines clean.
Drainage deserves its own moment of attention. Water needs to go somewhere: either it sheds off the patio surface via the 1:60 fall onto a lawn or planted bed, or it needs to be collected in a linear drain (sometimes called an ACO drain) and piped to a soakaway or surface-water drain. If the patio is enclosed by walls or fencing on multiple sides, a linear drain at the low point is essential. Running a pipe from the drain to a soakaway positioned at least 3m from the house and any boundary is the simplest solution. Do not connect patio drainage to a foul sewer.
Installing the patio surface step-by-step
With your subbase compacted, edging set, and levels checked, you are ready to lay the surface. Once you have the subbase and drainage sorted, follow the right surface-laying method for your materials to build the patio yourself. The method differs slightly depending on whether you are using mortar-bedded slabs or flexible block paving, so here is a clear breakdown of both. Once you know the basics, this diy how to lay a patio guide will help you move from subbase and edging to a finished, long-lasting surface lay the surface.
Mortar bed method (slabs, stone flags, porcelain)
- Mix your mortar to a firm but workable consistency (typically 4 parts sharp sand to 1 part cement, sometimes called a semi-dry mix). It should hold its shape when squeezed but not be sloppy.
- Lay a mortar bed 25-50mm thick across the area for one slab at a time. Do not spread mortar for multiple slabs in advance as it will dry before you get to it.
- For natural stone flags especially, also butter the back face of the slab with a thin layer of mortar before placing it. This fills the irregular back surface and ensures full contact.
- Lower the slab into position and tap it down with a rubber mallet, checking levels with a spirit level against your string lines as you go.
- Maintain consistent joint gaps as you work. For slabs, 10-15mm joints are typical; for porcelain, follow the manufacturer's guidance, usually 5-10mm, and always leave a full flexible perimeter joint at any fixed boundary.
- Work backwards (away from the house) so you are never kneeling on newly laid slabs. Use a kneeling board if needed to spread your weight.
Flexible method (concrete block paving)
- Screed a layer of sharp sand (also called the laying course) to a consistent depth of 70-80mm after compaction. Use two parallel guide rails and a screed board to get a smooth, even surface.
- Do not walk on the screeded sand after levelling it. Lay your blocks working forward from a fixed edge, placing each block tight to its neighbour.
- Lay the pattern to your design (herringbone at 45 or 90 degrees, stretcher bond, basketweave). Herringbone at 45 degrees gives the best interlock for areas with any vehicle traffic.
- Once an area is laid, compact the blocks with the plate compactor, running over them twice in different directions. The blocks will drop approximately 5-10mm during this process, which is expected.
- After initial compaction, spread kiln-dried jointing sand over the surface and brush it into the joints. Compact again, then top up the sand and compact once more until joints are filled.
- Leave the blocks 5mm proud of the final finished height before the first compaction pass to allow for this settlement.
Leveling, cutting, finishing, and jointing
Getting the levels right as you lay is far easier than trying to correct them afterwards. Check every slab with a spirit level in two directions, and use a long straightedge or a taut string line to check across several slabs at once. A 3mm variation across a run of slabs is acceptable; anything beyond that will be noticeable and can become a trip hazard.
Cutting slabs and blocks
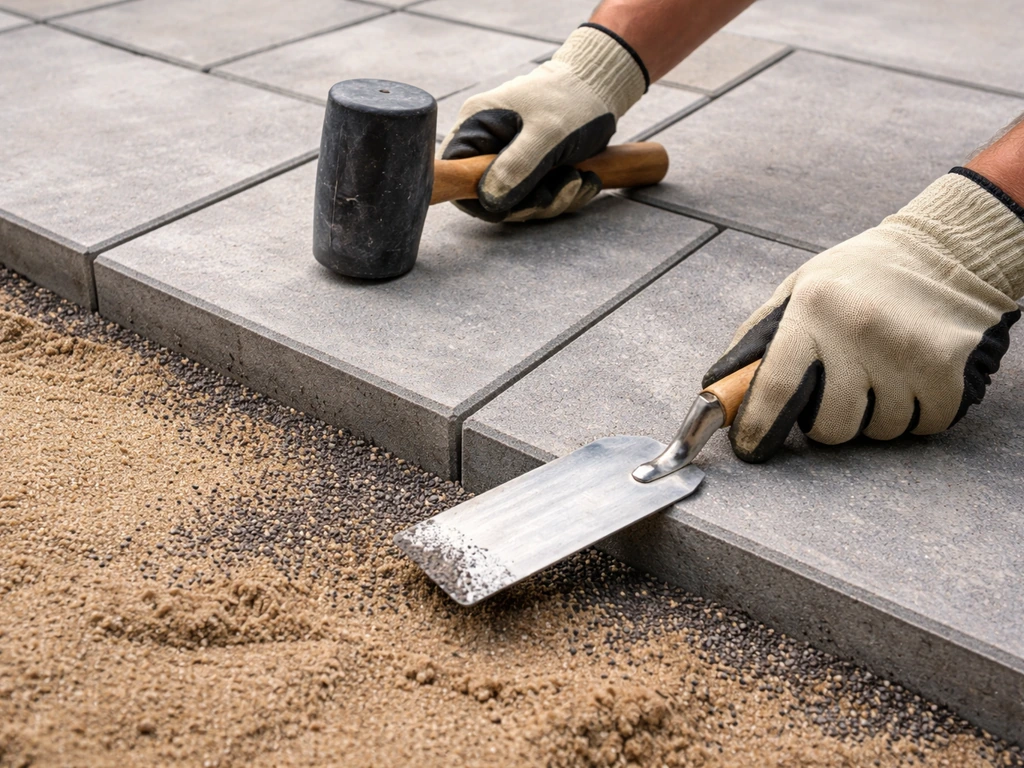
You will almost certainly need to cut some pieces. For a few straight cuts on concrete slabs, a disc cutter (angle grinder with a diamond blade) works fine. For a large project or for porcelain, hire a wet-cutting bench saw. Porcelain is particularly brittle with a disc cutter and chips badly. Always wear eye protection and a dust mask, and wet-cut natural stone to reduce silica dust. Mark your cut line with chalk or a marker, score first if using a disc cutter, and cut steadily in one pass.
Jointing options
For mortar-bedded slabs, the joints are usually filled with a pointing mortar (3 parts soft sand to 1 part cement). Mix it dryer than you think and work it firmly into the joint with a pointing trowel or a grout float, leaving a slightly recessed, brushed finish. Do not smear mortar across the slab face if you can help it, and wipe any smears off with a damp sponge before they cure.
Polymeric jointing sand is an increasingly popular alternative for both slab and block paving joints. It contains a polymer resin that binds the sand grains together once wetted and cured, creating a firm joint that resists weeds and is scour-resistant. It does not bond to the paving itself, it just stabilises the joint fill. Brush it in dry, compact, then mist with water to activate. Follow the manufacturer's drying time exactly. For block paving, kiln-dried sand swept into tight joints (no greater than 5mm, ideally around 3mm) is the traditional method and still very effective, but joints need topping up after the first few months as the sand settles.
For outdoor porcelain, use a flexible, frost-resistant grout or a modified polymer jointing product. The key rule with porcelain is to leave a full perimeter expansion joint (filled with a flexible sealant, not mortar) wherever the paving meets a wall, step, or fixed object. Exterior tile installations need flexible movement joints every 2.4 to 3.6 metres in both directions to accommodate thermal expansion. Miss these and you will see cracked or lifting tiles within a year.
Common mistakes and troubleshooting for a long-lasting patio
Most patio failures trace back to one of a small number of avoidable mistakes. Here are the ones that come up again and again, and what to do about each. If you are looking for how to lay a patio in the UK, use the sections above to plan the base, drainage, and joints before you start how to lay a patio uk.
| Problem | Root Cause | Fix or Prevention |
|---|---|---|
| Slabs sinking or rocking | Insufficient subbase compaction or inconsistent mortar bed | Lift the affected slab, add mortar, re-level, and relay. Prevent by compacting Type 1 properly in layers and using consistent bedding thickness |
| Water pooling on the surface | Incorrect or missing fall, or fall running toward the house | Re-check fall direction during planning. Minor pooling can sometimes be corrected by re-pointing low joints; significant pooling requires re-laying affected slabs |
| Joints cracking or crumbling | Mortar mix too wet, applied in cold or frosty conditions, or not enough joint depth | Rake out, clean, and re-point with a dryer mix. Never lay mortar below 3°C. Ensure joints are at least 20mm deep before pointing |
| Weeds growing through joints | Sand joints not kept topped up, detritus accumulating | Top up kiln-dried sand in block paving joints annually. For persistent weed problems, switch to polymeric sand or a stabilised jointing compound |
| Porcelain tiles cracking or lifting | No expansion joints, substrate movement, or adhesive applied to a contaminated surface | Prevent by planning expansion joints every 2.4-3.6m and using a flexible, frost-rated adhesive. Laid tiles may need professional assessment |
| Patio surface too close to DPC | Not accounting for 150mm DPC clearance in excavation calculations | Prevention is the only real fix. If discovered late, the patio level must be reduced or the DPC raised, both difficult. Get this measurement right before you dig |
| Edge blocks or slabs spreading | No concrete haunch or edge restraint on block paving | Excavate alongside the edge, install a concrete haunch, and reinstall the edging course on top |
One thing worth saying plainly: the YouTube videos that make patio laying look like an afternoon job are usually either very small projects or are skipping the compaction and curing steps. A proper patio for an average garden (say 20-30 square metres) realistically takes a weekend for the groundworks and another for the laying, with a few days of curing in between before you can use it fully. That timeline produces a patio that lasts. Rushing the curing stage, walking on mortar-bedded slabs too early, or skipping the plate compactor are the fastest routes to a patio you will be re-doing in three years.
If you are working on a particularly small area or tackling your very first project, starting with a simpler design (straight edges, a single slab size, no cuts required) makes the whole job far less stressful. Once you have the process down, more ambitious layouts with mixed sizes, curves, or premium materials like porcelain or slate become much more approachable. The fundamentals you nail on a simple patio, getting the fall right, compacting the subbase properly, and finishing the joints neatly, are exactly the same skills every more complex project builds on.
FAQ
Do I need planning permission or building control approval before I lay a patio?
In many cases a garden patio is considered minor development, but if you are paving near a listed building, within a conservation area, or changing drainage runoff, check local rules. If the patio affects surface water disposal or ties into existing drainage systems, building control or a professional consult can prevent compliance issues later.
What’s the safest way to handle patio-to-house transitions if the DPC line is hard to find?
If you cannot clearly see the damp proof course, find it by measuring from an external datum on the wall and confirming with existing brickwork gaps and typical course heights. Mark the target finished level before excavation and double-check that the patio area will not end up higher than the allowed clearance after bedding and joints are added.
How do I choose the right subbase thickness for a patio that gets heavy use (barbecue, hot tub, furniture)?
Base the build-up on expected point loading, not just foot traffic. If you expect concentrated loads, increase subbase depth where practical, ensure full compaction in layers, and consider a more rigid system. Avoid relying on thicker bedding alone, it won’t compensate for a weak or poorly compacted base.
Can I lay a patio over existing paving or old slabs?
Usually you should remove the old material and re-excavate to the correct finished level. Re-laying on top can trap organic material, reduce fall, and make it hard to achieve proper edge restraint. If removal is impractical, at minimum inspect for voids, settlement, and ensure drainage fall is still achievable.
Should I use MOT Type 1 or a different hardcore product?
Type 1 is a common, consistent choice because it compacts well. If you use a substitute, confirm it is suitable for subbase compaction and not a topsoil or waste aggregate that may break down. If the material won’t consolidate under a plate compactor, you will likely get future settlement.
How can I tell if the subbase is compacted enough before laying slabs?
After compaction in layers, the surface should not visibly “pump” or move when the plate compactor runs over it. If you see ridges forming, bouncing, or loose material being displaced, you need more passes and possibly deeper or smaller compaction lifts.
Is polymeric jointing sand safe for all patio materials?
It works best for paving joints that allow water movement to drain away properly, and it must be compatible with your paving type. Avoid using polymeric sand if you need wider movement gaps that should be left for flexible grout or sealed perimeter joints. Always follow the manufacturer’s watering and curing times, over-wetting can weaken joints.
What should I do if my patio area has trees or thick roots nearby?
Remove turf and roots in the excavated zone, and treat any remaining root mass as a structural risk because it will rot, create voids, or lift the base. If roots are difficult to remove, discuss professional options, because simply leaving roots under the subbase undermines the longevity the rest of the build depends on.
How do I manage drainage if my patio is enclosed by walls on multiple sides?
A linear drain at the low point is usually the reliable approach, then route the outlet through a suitable soakaway or surface-water route. Keep the outlet well away from the house and boundaries (often at least a few metres, depending on site conditions) and do not connect to foul sewer systems.
What expansion and movement joints are most important for mortar-bedded slabs?
Keep perimeter movement gaps where paving meets fixed structures, and do not fill those with rigid mortar. Plan for flexible joints at walls, steps, or features that can move or experience thermal movement, and maintain consistent joint width where the system requires it.
Can I lay outdoor porcelain using the same method as natural sandstone slabs?
Porcelain typically needs a more controlled, rigid build-up and movement management, including proper expansion joints at fixed edges and regular movement joints across larger runs. If your base is slightly uneven or your joints do not include movement allowance, porcelain is more likely to crack or lift compared with more forgiving materials.
How long should I wait before walking on mortar-bedded slabs?
Do not rush. Even if the pointing mortar or bedding seems set, walking forces can disturb the system before it gains enough strength. Use cure guidance from your specific mortar mix and local weather conditions, and treat the patio as a working surface only when joints and bedding have fully cured.
What’s the best way to reduce chipping when cutting porcelain or large stone slabs?
For porcelain, a disc cutter can chip, a wet-cutting bench saw is often the safer choice for clean edges. Mark accurately, support the slab fully so it does not flex, and cut steadily. Also plan layout so you minimize the number of full-width edge cuts at visible borders.
How do I avoid leaving smears or ruining slab faces with mortar pointing?
Tool joints without spreading mortar across the slab face, then wipe any accidental marks immediately with a damp sponge before curing. Once mortar starts to harden, cleaning becomes much harder and staining or rough patches can remain permanently.
My patio looks level while laying, but settles later. What usually causes it?
Most settlement comes from subbase issues (insufficient compaction, organic material left in place, or uneven excavation) or from edges that are not restrained. Check for any soft spots before bedding, ensure topsoil is removed entirely, and make sure haunching or edge restraint is done before laying interior units.
Do I need to re-top-up block paving joints after installation?
Often yes. Even with good kiln-dried sand, joints can settle in the first few months, especially after rain. Re-check and top up to maintain joint stability, but avoid dumping sand in a way that creates mounds above the joint line.